Somo
Hapo chini utapata maelezo kwa baadhi ya mifano muhimu.
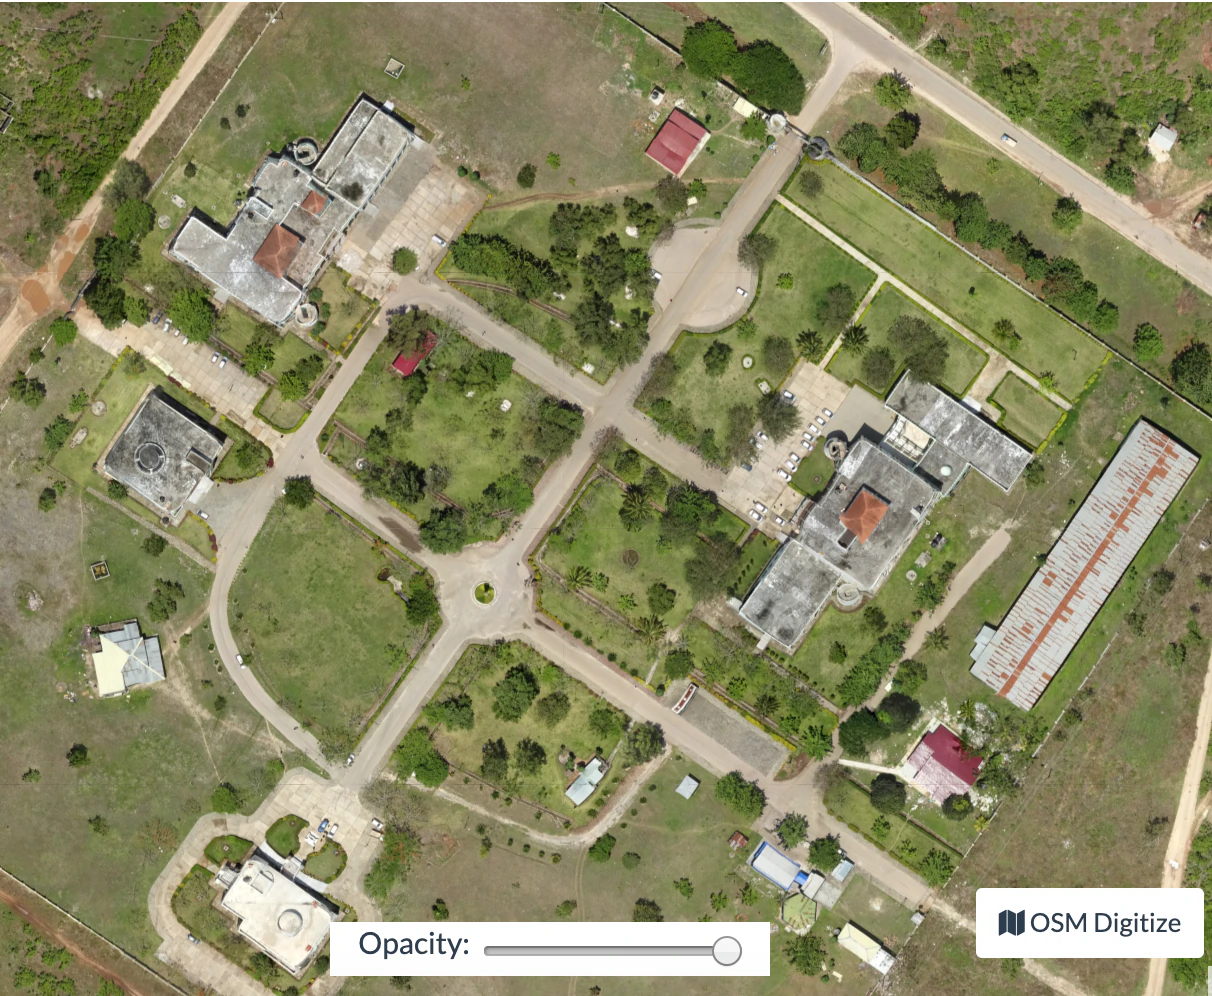
Tengeneza Orthophotos ya kitaalamu
Bila ya kuengeza paramiter, ODM inachagua nzuri baina ya ubora, kasi na nafasi ya kutumia. Ikiwa unataka kupata matokeo bora zaidi, utadadafua baadhi ya paramiter:
--orthophoto-resolutionni muonekano wa orthophoto ndani ya cm/pixel. Kupunguza hii thamani kwa muonekano mzuri zaidi.
--mesh-sizelazima iongezeke hadi300000-600000na--mesh-octree-depthlazima iongezeke hadi10-11mjini kwa kutengeneza upya majengo mazuri/ mapaa.
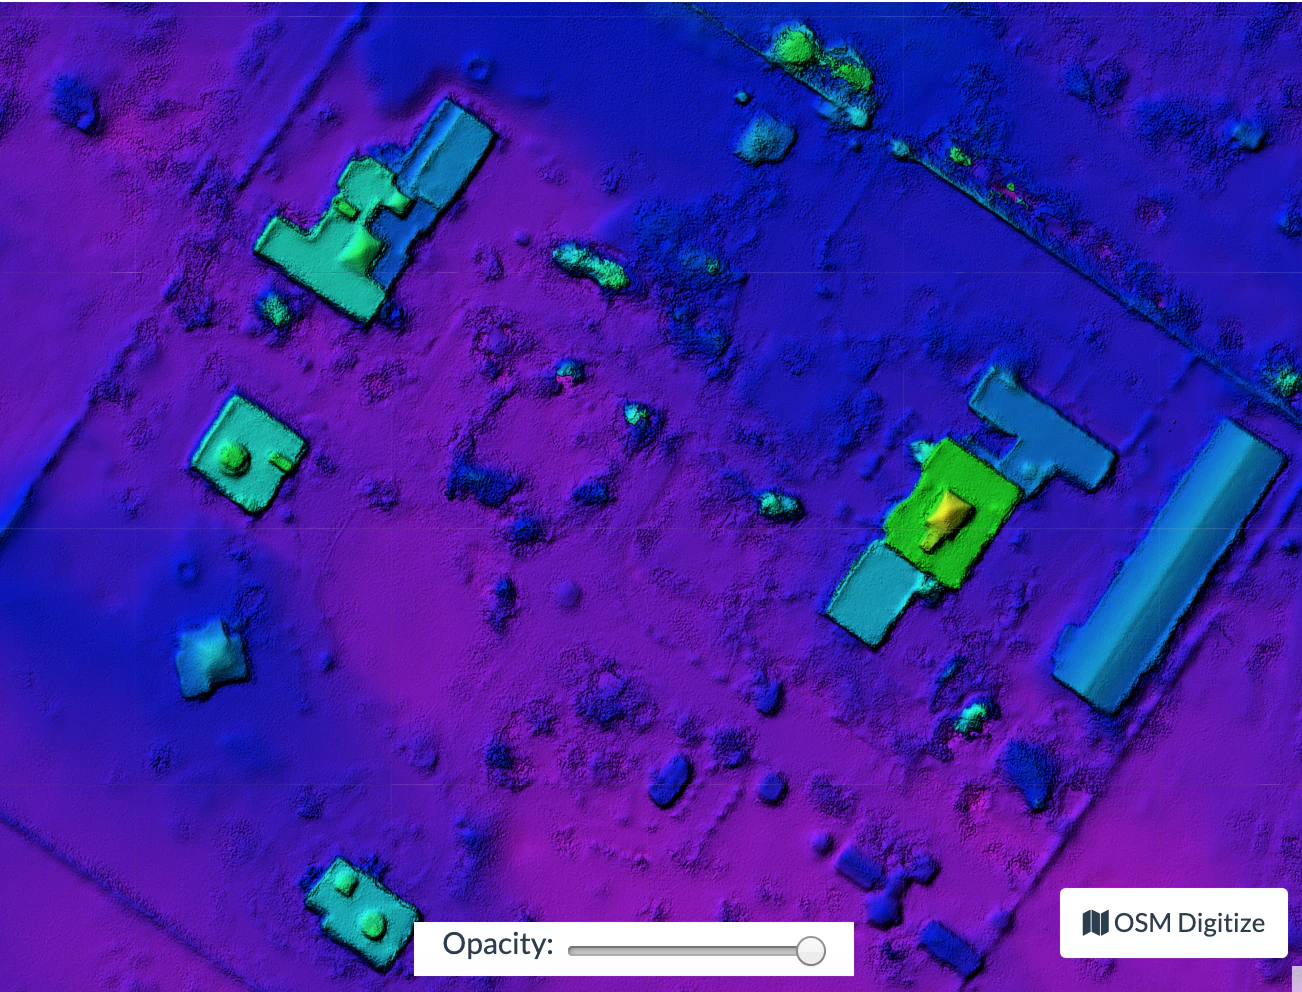
Kutengeneza Digital Elevation Model
By default ODM does not create digital elevation models (DEMs). To create a digital terrain model, make sure to pass the --dtm flag. To create a digital surface model, be sure to pass the --dsm flag.
Kizazi cha DTM, Simple Morphological Filter (smrf) inatumika kugawa point katika ground na non-ground pia ground point pekee inatumika. Ni smrf kichujo kinaweza kidhibitiwa kutumia mihimili tofauti:
--smrf-scalarkipimo halisi. engeza hii paramiter kwa terrain kwa badiliko la urefu mkubwa.
--smrf-slopemteremko parameter, ambayo imepimwa kwa "slope tolerance". Increase inaengeza parameter kwa terrain kwa urefu mwingi variation. Lazima ipangwe kwa kitu kikubwa kuliko 0.1 na isiwe kubwa kuliko 1.2.
--smrf-thresholdelevation threshold. Weka hii parameter kwa kiwango cha chini cha urefu (cha mita) ambayo unategemea kuwa non-ground object.
--smrf-windowwindow radius paramita (ya mita) ambayo inashabihiana na ukubwa wa kitu (jengo, mti, n.k) kwa kuondolewa. lazima lipangwe nambari kubwa zaidi ya 10.
Kubadilisha njia hizi kunaweza kubadilisha maana ya matokeo ya DTM. Mwanzo mzuri kusoma kwa kufahamu vipi paramita zinabadilisha matokeo ni kusoma pepa ya awali An improved simple morphological filter for the terrain classification of airborne LIDAR data (Inapatikana bure PDF).
Majumuisho ya njia smrf-threshold yanaleta matokeo makubwa.
SMRF ni nzuri kwa kupunguza makosa ya uwandishi (nambari ndogo ya makosa ya groundpoint imegawanywa kama non-ground) lakini "acceptable" pekee kuepuka makosa Type II (nambari kubwa ya non grond point kimakosa imegaiwa kama ground). Mahitaji haya yanachukuwa kwa uwangalifu wakati inatengenezwa DTM ambayo ilikusudiwa kutumika kuonekana, tangu makosa ya kitu kwa muonekano wa ground mfano mdogo katika DTM ya mwisho.

Paramita nyengine mbili zinabadilisha kizazi cha DEM:
--dem-resolutionambayo inaseti muonekano wa matokeo ya rasta DEM (cm/pixel)
--dem-gapfill-stepsinayotambua namba ya maendeleo ya matabaka ya DEM kutumika. Katika maeneo ya miji engeza idadi hii hadi 4-5 inaweza kusaidia kutoa matokeo katika eneo lililoachwa wazi kwa SMRF mchujo.
Mfano wa kutengeneza DEM:
docker run -ti --rm -v /my/project:/datasets/code <my_odm_image> --project-path /datasets --dtm --dem-resolution 2 --smrf-threshold 0.4 --smrf-window 24
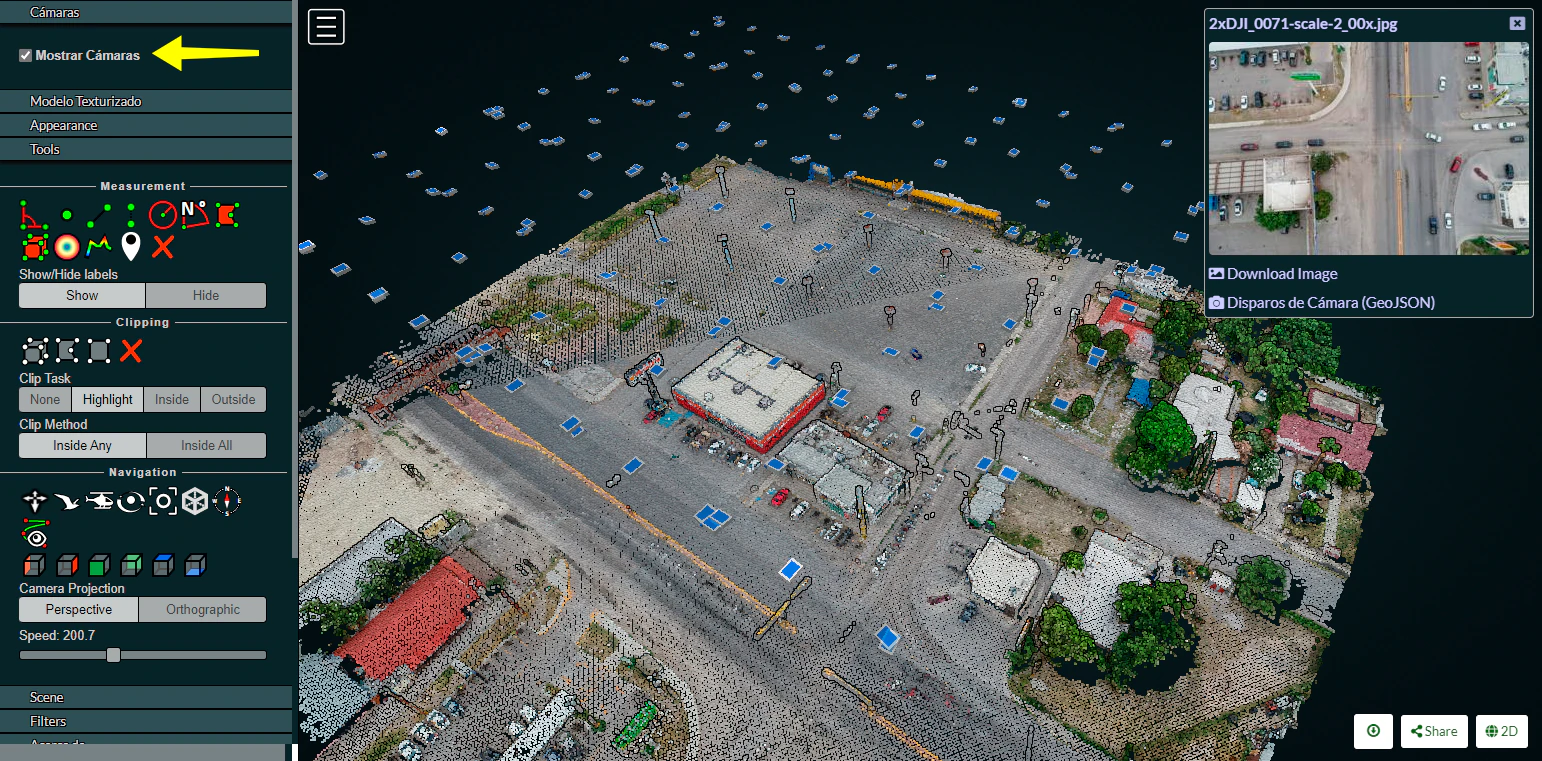
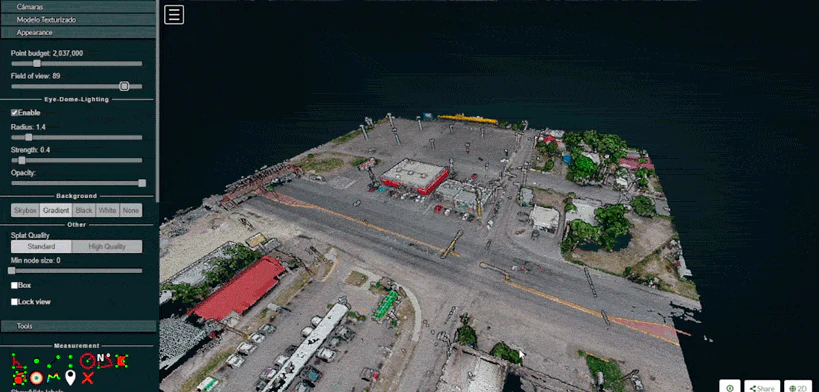
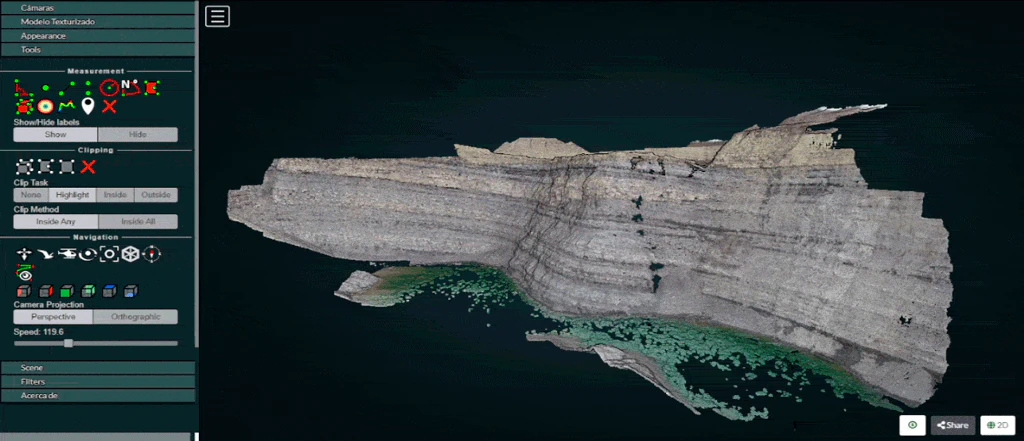
Using Potree 3D viewer module on OpenDroneMap Desktop
Cameras
Activate this function to display camera positions.
You can also click in the camera icon to display single images in a frame on the upper right corner. A click on the image frame toggles into full screen mode.
Within the image frame there are links to download the image and the GeoJSON camera file.
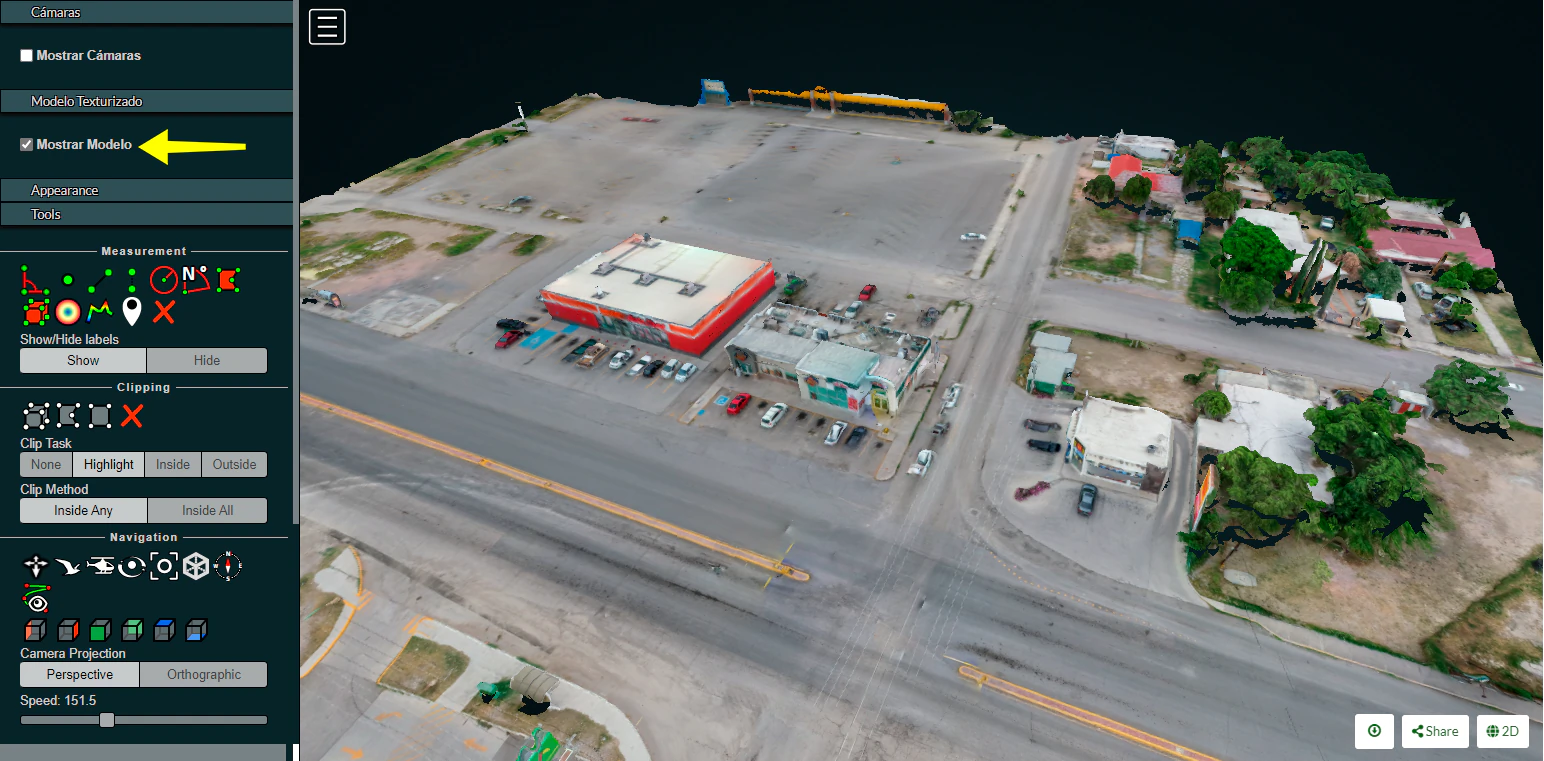
Textured model
Activate this function to show load the textured model. Depending on the file size and connection speed, it may take several seconds to load.
Appearance
Point budget
For both appearance and performance purposes, the point budget on the scene can be managed. Some old and less capable machines would benefit from a 500,000 point budget while most mid-range specs machine are capable of handling 1 to 2 million point budget.
A 5 to 7 million point budget produces a smooth point cloud 3d model, but may result in a high resource demanding process.
Default point budget value is set to 1,000,000.
Field of view
In order to control model elements to be included within the scene the field of view can be adjusted. Default value is set to 60 degrees.
Eye Dome-lighting
The Potree Point Cloud 3d viewer module can implement eye dome-lighting, a lighting model that accentuates the shapes of objects.
Eye Dome-lighting group objects, shade their outlines and enhances depth perception in scientific visualization images. It is useful for recognition and measurement of structures within a model. It can be modified by adjusting Radius, Strength and Opacity.
By default, Eye Dome-Lighting is enabled on Potree 3D viewer, but it can be disabled by clicking on the enable option.
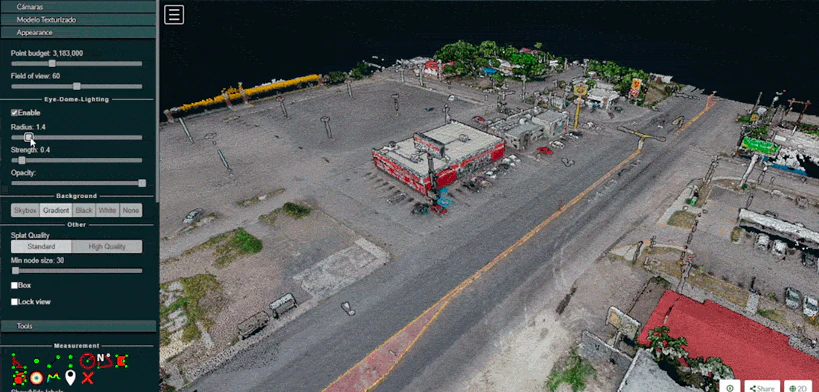
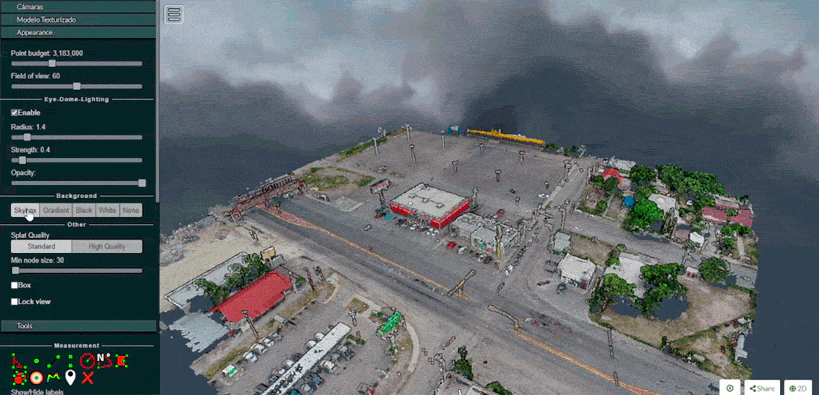
Background
Potree 3D viewer background can be modified. Available options are Skybox / Gradient / Black / White / None
Other
Splat Quality = Splat quality can be adjusted to standard or high quality, to improve the appearance of the model.
Min node size = Min node size option will impact the point density of the nodes represented.
Box = Display the boxes of the nodes.
Lock view = Lock the point cloud view, preventing to load or unload points to the model.
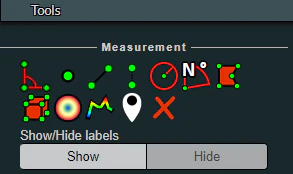
Tools
Measurement
Potree 3D viewer module provides several tools for measurement. This tool set consist of 12 elements. It also has controls for showing or hiding the resulting measurement labels.
Measurements are performed by left clicking on the desired points and for some tools right clicking is needed in order to terminate the process.
Angle
This tool measures the tridimensional angle formed by the lines connecting 3 points. To start a measurement, click on the angle icon, then left click on 3 point and the process will be automatically ended. Further information can also be obtained from selecting this element under the scene section.
Point
This tool highlights a selected point and display its XYZ coordinate. To start a measurement, click on the point icon, then click on the desired point and the process will be automatically ended. Further information can also be obtained from selecting this element under the scene section.
Distance
This tool measures the tridimensional distance of the lines connecting a series of points. To start a measurement, click on the distance icon and start clicking on the desired points (two or more). Right click to finish measurement. Further information such as Total length can also be obtained from selecting this element under the scene section.
Height
This tool measures the height or vertical distance between two points. To start a measurement, click on the height icon and then click on the desired two points. The process will be automatically ended. Further information can also be obtained from selecting this element under the scene section.
Circle
This tool measures the radius of a circle formed by three points. To start a measurement, click on the circle icon and then click on the desired two points. The process will be automatically ended. Further information such as Circumference can also be obtained from selecting this element under the scene section.
Azimuth
This tool measures the azimuthal angle of a line. This line is formed by two points selected by the user, the angle is measured in degrees, clockwise from 0 to 360 and starting from the geographical north. To start a measurement, click on the azimuth icon and then click on the desired two points. The process will be automatically ended. Further information can also be obtained from selecting this element under the scene section.
Area
This tool measures the horizontal area formed by a polygon. To start a measurement, click on the area icon and start clicking on the points forming the desired polygon (three or more). Right click to finish measurement. Further information can also be obtained from selecting this element under the scene section.
Volume (cube)
This tool measures the volume formed by a cube. To start a measurement, click on the volume (cube) icon and click on the model to place the cube. It is possible relocate, redimension and rotate the cube using the displayed handlers. Right click to finish measurement. Further information can also be obtained from selecting this element under the scene section.
Volume (sphere)
This tool measures the volume formed by a sphere. To start a measurement, click on the volume (sphere) icon and click on the model to place the sphere. It is possible relocate, redimension and rotate the sphere using the displayed handlers. Right click to finish measurement. Further information can also be obtained from selecting this element under the scene section.
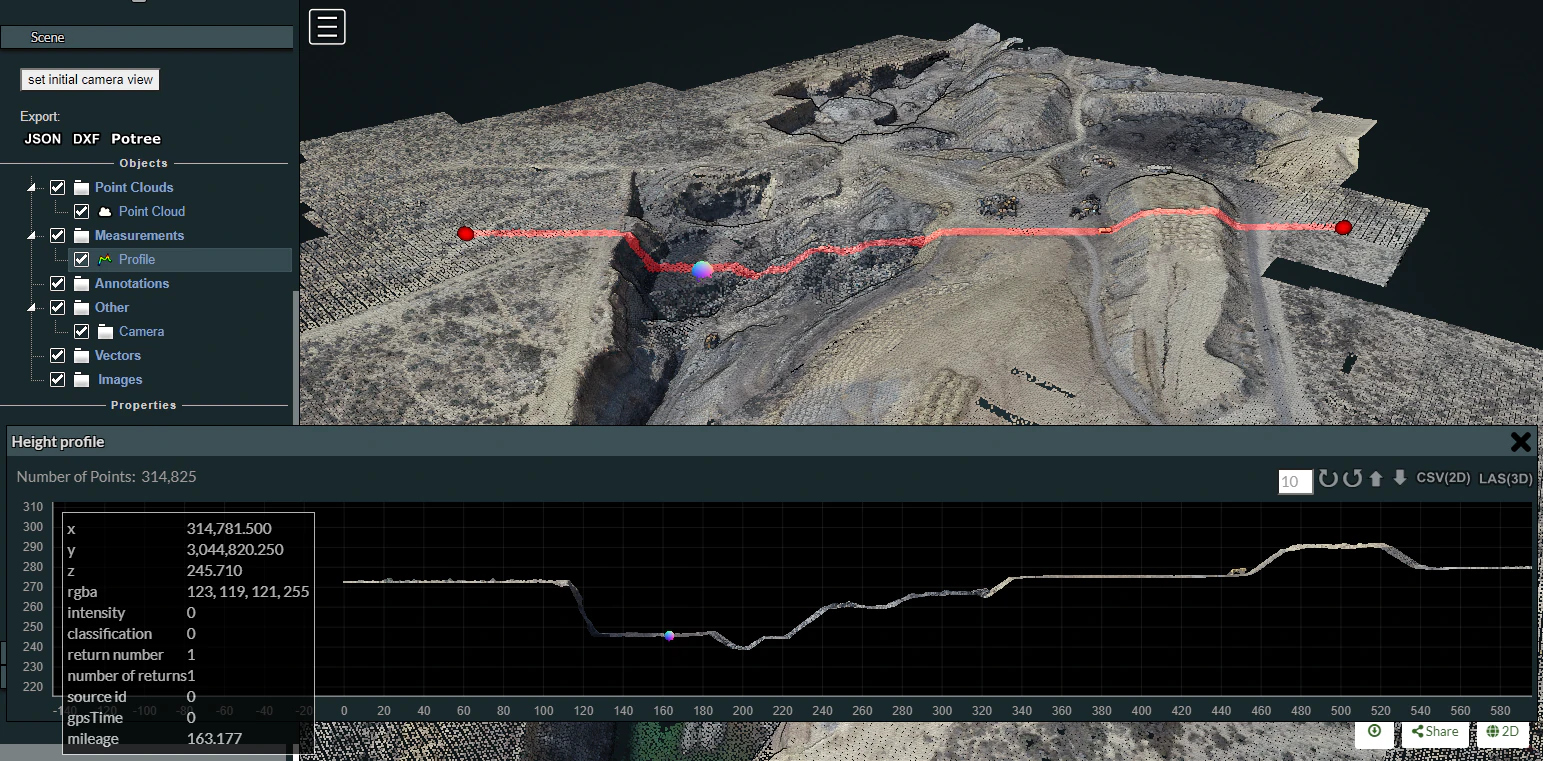
Height profile
This tool creates a height profile formed by a line on the model. To start a measurement, click on the Height profile icon and then form a line on the model by clicking on the desired points (two or more). Right click to finish measurement. Further information and options, such as "Show 2d Profile", can also been obtained from selecting this element under the scene section.
Annotation
This tool creates an annotation label on a highlighted point on the model. To start a measurement, click on the annotation icon and then click on the desired point. The process will be automatically ended. To edit the annotation, select this element under the scene section, then edit Title and Description.
Remove measurements
This tool removes all measurements on the model. To remove all measurement, click on the "Remove measurements" icon.
Clipping
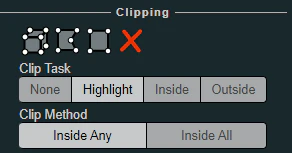
Point cloud can be clipped by selecting an area. Clipping options include None / Highlight / Inside / Outside
To clip a point cloud, click on the volume clip icon, place the cube on the model and relocate, redimension and rotate to contain the desired area. Highlight is set by default as the clipping method. If display only the points contained within the cube click on "Inside", otherwise click on "Outside".
To remove the clipping volume or polygons click on the "Remove all measurements" icon.
Navigation

Potree 3D viewer have 4 Navigation controls which define its behavior.
Earth Control
Earth control navigated as anchored to the ground. Mouse left button moves the model horizontally, mouse wheel controls zoom and right button orbits the model.
Fly control
Fly control moves the camera as in birds eye using the keyboard. Keys "W" and "S" moves forward and backwards, respectively and in the direction of the camera, while "A" and "D" moves left and right respectively. Also, the "R" and "F" keys moves the camera up and down. The mouse left button changes the direction of the camera, mouse wheel controls zoom, and right button moves the camera in the XYZ axis.
The speed for these movements can be controlled using the sliding control.
Helicopter control
Helicopter control moves the camera as in an aircraft using the keyboard. Keys "W" and "S" moves forward and backwards, respectively restricted in a horizontal plane, while "A" and "D" moves left and right respectively. Also, the "R" and "F" keys moves the camera up and down. The mouse left button changes the direction of the camera, mouse wheel controls zoom, and right button moves the model in the XY axis.
The speed for these movements can be controlled using the sliding control.
Orbit Control
Orbit Control is the default navigation behavior. The mouse left button orbits the model, the wheel controls zoom and the right button moves the model in the XYZ axis.
Full extent
Full extent button restores the model view.
Navigation cube
Navigation cube displays a wireframe cube containing the model.
Compass
Compass button displays a compass on the upper right corner.
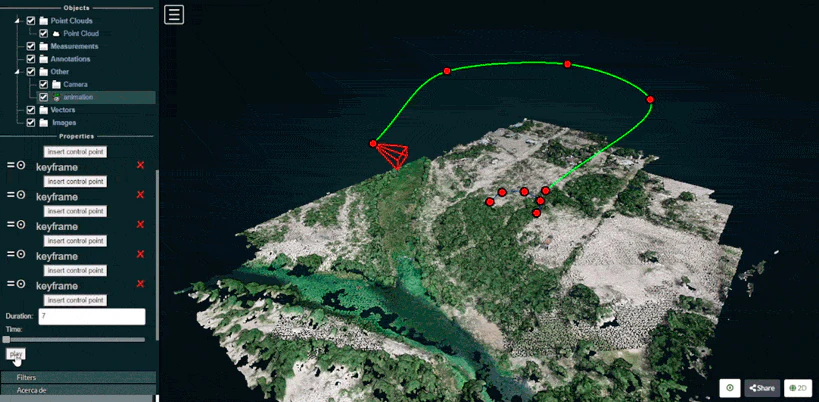
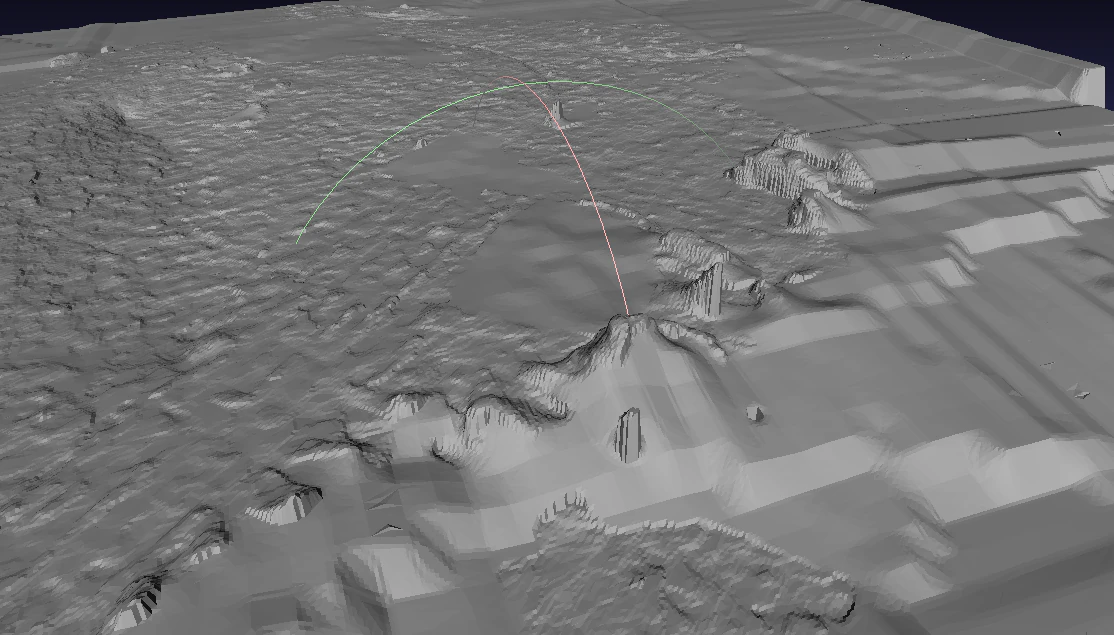
Camera animation
The camera animation button creates a camera animation path. Position of the camera is defined by the points on the green line while the points in the blue line are the location towards the camera is intended to be facing.
To create an animation, adjust the points for the camera locations and camera direction, then select the camera element under the Scene section to create more point, change animation speed or play the animation.
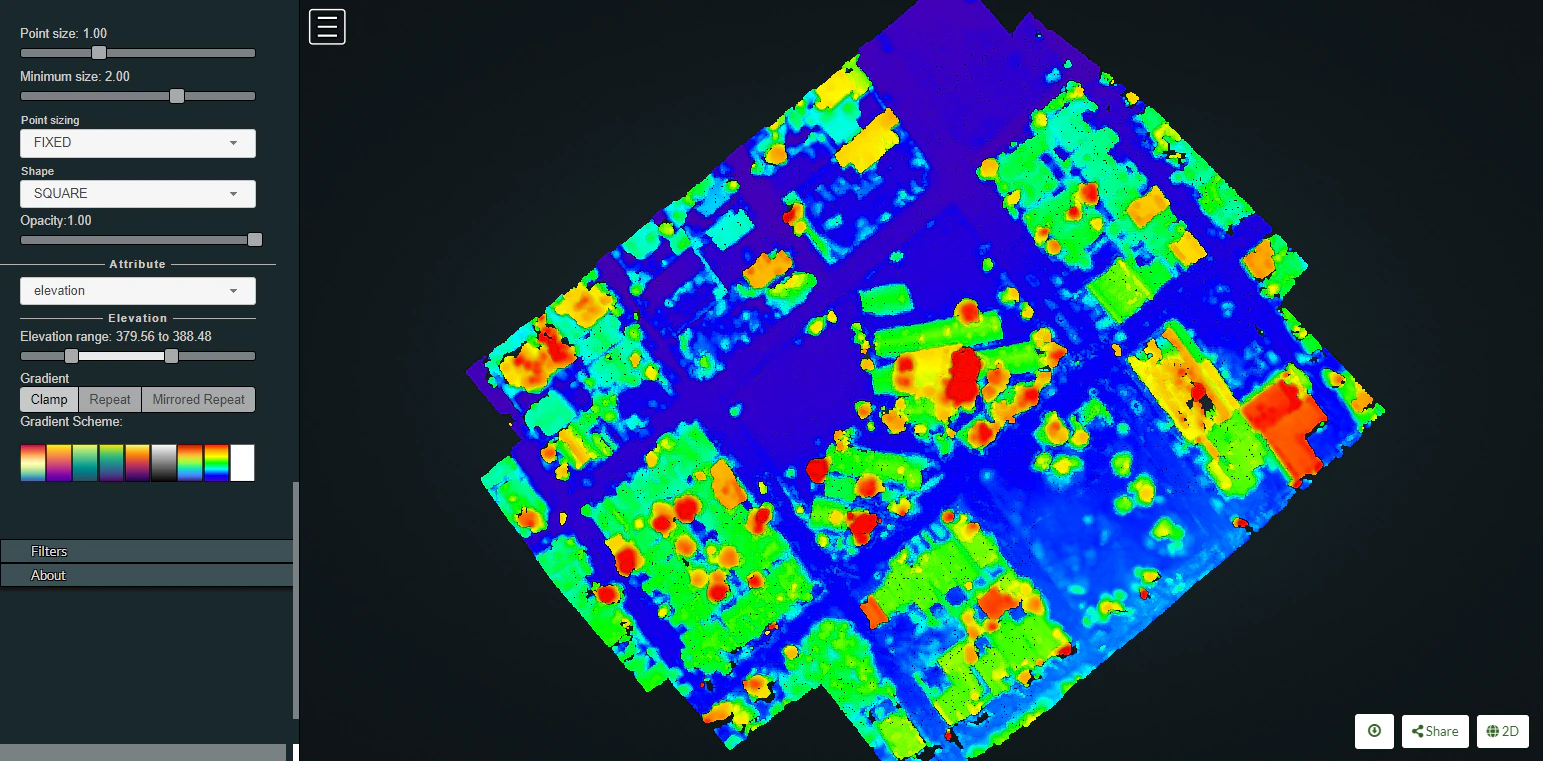
Scene
The Scene section displays a file tree containing all the scene elements. Elements are arranged in six groups, which are Point clouds / Measurements / Annotations / Other / Vector / Images
Each element under these groups can be selected to get further information or to control its properties.
For instance, point clouds properties can be modified to show elevation and also the color ramp cam be customized.
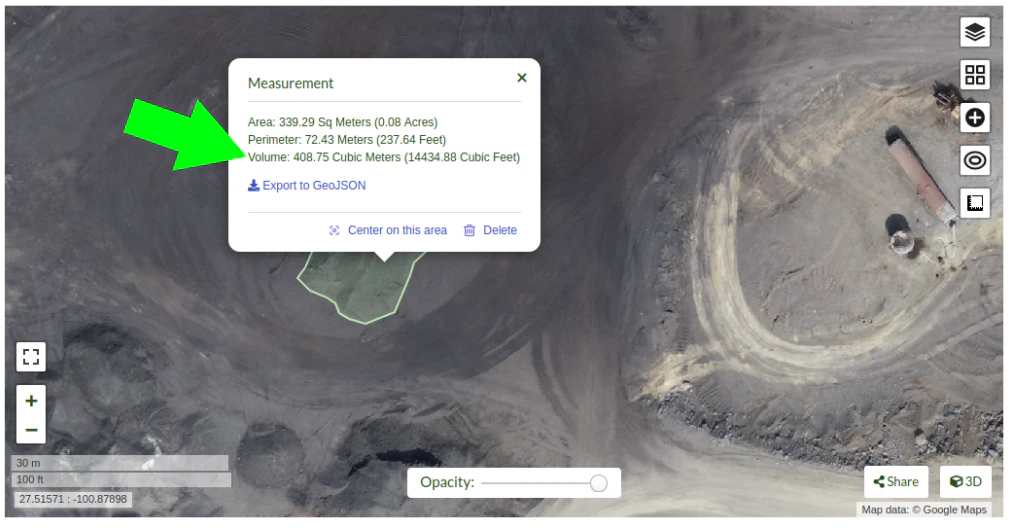
Measuring stockpile volume
Fieldwork planning
Weather conditions modify illumination and thus impact the photography results. Best results are obtained with evenly overcast or clear skies. Also look for low wind speeds that allow the camera to remain stable during the data collection process. In order to avoid shadows which on one side of the stockpile can obstruct feature detection and lessen the number of resulting points, always prefer the flights during the midday, when the sun is at the nadir so everything is consistently illuminated. Also ensure that your naked eye horizontal visibility distance is congruent with the planned flight distances for the specific project, so image quality is not adversely impacted by dust, fog, smoke, volcanic ash or pollution.
Flight pattern
Most stockpile measurement jobs does not require a crosshatch pattern or angled gimbal as the resting angle of stockpile materials allows the camera to capture the entire stockpile sides. Only some special cases where erosion or machinery operations causes steep angles on the faces of the stockpile would benefit of the crosshatch flight pattern and angled camera gimbal but consider that these additional recognized features come at a cost, (in field labor and processing time) and the resulting improvements are sometimes negligible.
In most of the cases a lawn mower flight pattern is capable of producing highly accurate stockpile models.
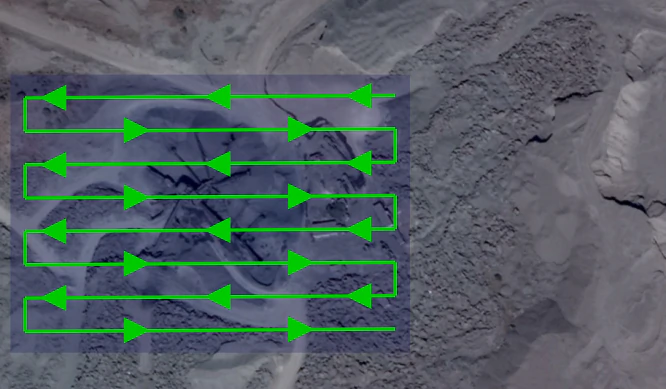
Recommended overlap would be between 75% and 80% with a sidelap in the order of 65% to 70%. It is also recommended to slightly increase overlap and sidelap as the flight height is increased.
Flight height
Flight height can be influenced by different camera models, but in a general way and in order to ensure a balance between image quality and flight optimization, it is recommended to be executed at heights 3 to 4 times the tallest stockpile height. So for a 10 meter stockpile, images can be captured at a height of 40 meters. As the flight height is increased, it is also recommended to increase overlap, so for a 40 meter height flight you can set a 65% sidelap and 75% overlap, but for a planned height of 80 meters a 70% sidelap and 80% overlap allowing features to be recognized and properly processed.
GCPs
To achieve accuracy levels better than 3%, the use of GCP’s is advised. Typically 5 distributed GCP are sufficient to ensure accurate results. When placing or measuring GCP, equipment accuracy should be greater than the GSD. Survey grade GNSS and total stations are intended to provide the required millimetric accuracy.
For further information on the use of GCPs, please refer to the Ground Control Points section.
Processing parameters
A highly accurate model can be achieved using OpenDroneMap Desktop high resolution predefined settings. Then you can further adjust some parameters as necessary.
If using ODM, these this reference values can help you configure the process settings.
--dsm: true
--dem-resolution 2.0
--orthophoto-resolution 1.0
--feature-quality high
--pc-quality high
Measuring
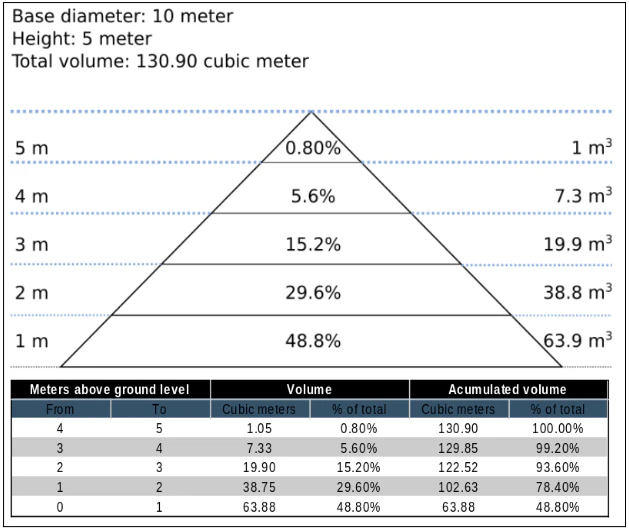
As almost 50% of the material will be found in the first 20% of the stockpile height, special care should be taken in adequately defining the base plane.
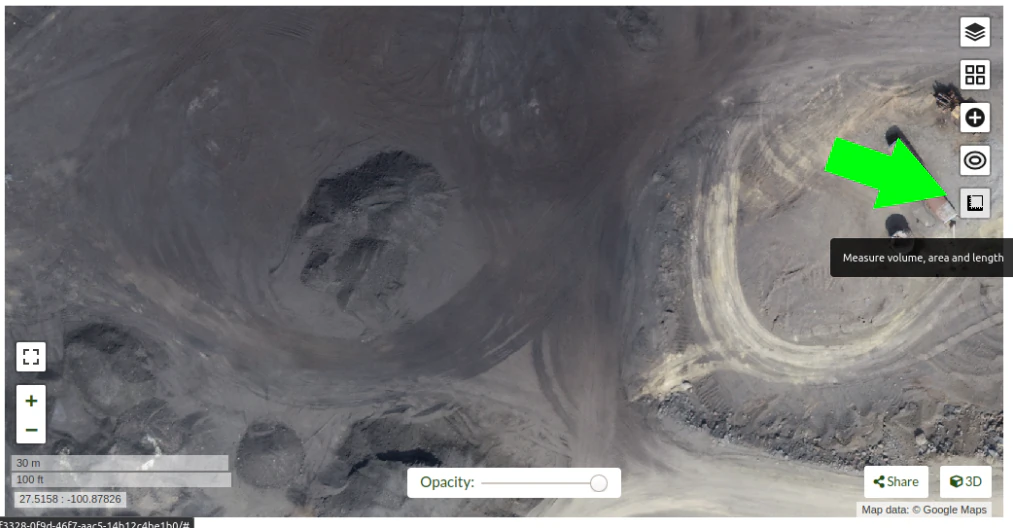
In OpenDroneMap Desktop Dashboard, clic on "view map" to start a 2D view of your project.
Once in the 2D map view, clic on the "Measure volume, area and length" button.
then clic on "Create a new measurement"
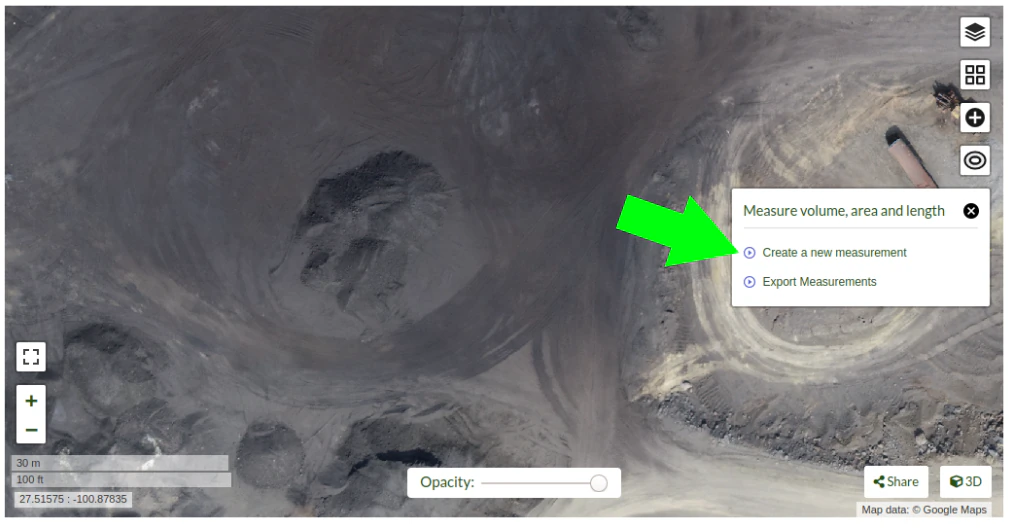
Start placing the points to define the stockpile base plane
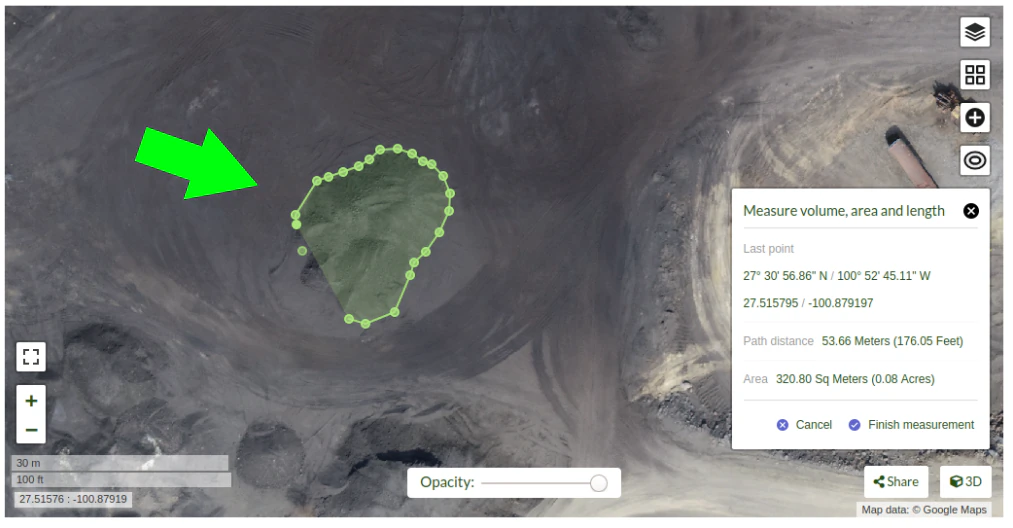
Clic on "Finish measurement" to finish the process.
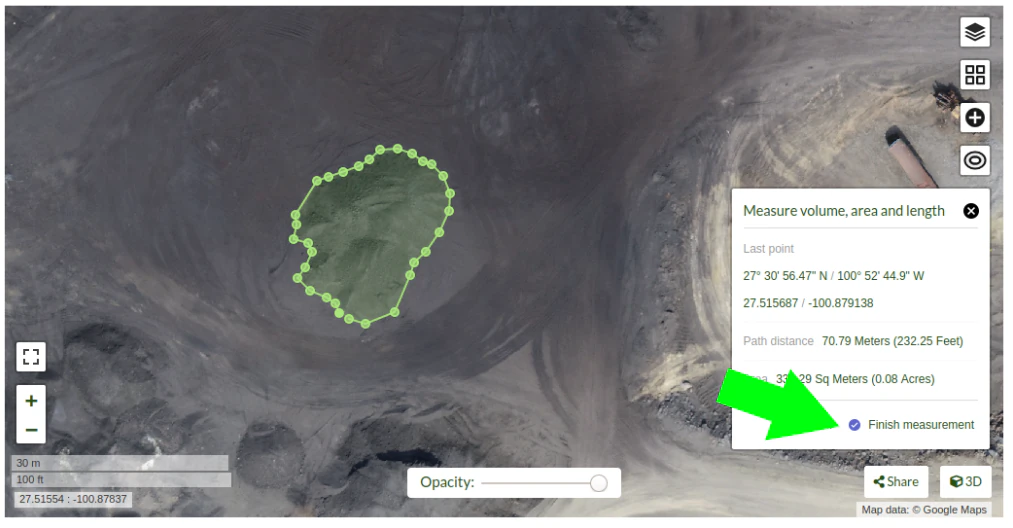
Dialog box will show the message "Computing ..." for a few seconds, and after the computing is finished the volume measurement value will be displayed.
If you are using the command line OpenDroneMap you can use the dsm files to measure the stockpile volumes using other programs.
Also consider that once the limits of the stockpile are set in software like QGis, you will find there are some ways to determine the base plane. So for isolated stockpiles which boundaries are mostly visible, a linear approach can be used. While for stockpiles set in slopes or in bins, the base plane is better defined by the lowest point. Creation of a triangulated 3D surface to define the base plane is advised for large stockpiles. This is also valid for stockpiles paced on irregular surfaces.
Expected accuracy
For carefully planned and executed projects, and specially when GSD is less than 1 cm, the expected accuracy should be in the range of 1% to 2%. The resulting accuracy is comparable to the commercially available photogrammetry software and the obtained using survey grade GNSS equipment.
Kutumia Docker
Tangu watumiaji wengi kutumia docker kuingiza OpenDroneMap itakua ni vizuri kufanhamu camandi za msingi kuitathmini mifano ya docker wakati ikitokea makosa, au tukiwa na wasiwasi wa matokeo. Docker ni mkusanyiko wa muonekano uliopangwa, miongoni mwa vitu vyengine kufanya urahisi wa kuingiza software kwa kujitegemea kwenye mazingira ya nyumbani. Kwa njia hii ni sawa na virtual mashine.
Comand chache rahisi zinaweza kufanya docker yetu kwa nzuri zaidi.
Kutumia Docker mashine
Tunaweza kuanza kwa kusikiliza docker zilizopo katika mashine ulionayo tunaanza kama ifuatavyo:
> docker ps
CONTAINER ID        IMAGE                  COMMAND                  CREATED             STATUS              PORTS                    NAMES
2518817537ce        opendronemap/odm       "bash"                   36 hours ago        Up 36 hours                                  zen_wright
1cdc7fadf688        opendronemap/nodeodm   "/usr/bin/nodejs /va…"   37 hours ago        Up 37 hours         0.0.0.0:3000->3000/tcp   flamboyant_dhawan
Ikiwa tunataka kuona mashine ambayo haifanyi kazi lakini docker inapatikana, tunaingiza -a flag:
> docker ps -a
CONTAINER ID        IMAGE                  COMMAND                  CREATED             STATUS                    PORTS                    NAMES
2518817537ce        opendronemap/odm       "bash"                   36 hours ago        Up 36 hours                                        zen_wright
1cdc7fadf688        opendronemap/nodeodm   "/usr/bin/nodejs /va…"   37 hours ago        Up 37 hours               0.0.0.0:3000->3000/tcp   flamboyant_dhawan
cd7b9585b8f6        opendronemap/odm       "bash"                   3 days ago          Exited (1) 37 hours ago                            nostalgic_lederberg
e31010c00b9a        opendronemap/odm       "python /code/run.py…"   3 days ago          Exited (2) 3 days ago                              suspicious_kepler
c44e0d0b8448        opendronemap/nodeodm   "/usr/bin/nodejs /va…"   3 days ago          Exited (0) 37 hours ago                            wonderful_burnell
Tumia logs kwenye instance
Au tumia CONTAINER ID au jina, tunamia logs pekee inapatika kwenye mashine kama ifuatavyo:
> docker logs 2518817537ce
Hii inategemewa kuwa kubwa, lakini tunaweza kutumia pipe | character na tools nyengine kuondosha kile tunachotaka kutoka kwenye log. Kwa mfano tunaweza kuondosha kupitia log kidogo kwa kutumia more command.
> docker logs 2518817537ce | more
[INFO]    DTM is turned on, automatically turning on point cloud classification
[INFO]    Initializing OpenDroneMap app - Mon Sep 23 01:30:33  2019
[INFO]    ==============
[INFO]    build_overviews: False
[INFO]    camera_lens: auto
[INFO]    crop: 3
[INFO]    debug: False
[INFO]    dem_decimation: 1
[INFO]    dem_euclidean_map: False
...
Kubonyeza Enter or Space, arrow key au Page Up or Page Down key itatusaidia kuelekeza kupitia log. Herufu ndogo ya Q itaturejesha nyuma kwenye comand line.
We can also extract just the end of the logs using the tail command as follows:
> docker logs 2518817537ce | tail -5
[INFO]    Cropping /datasets/code/odm_orthophoto/odm_orthophoto.tif
[INFO]    running gdalwarp -cutline /datasets/code/odm_georeferencing/odm_georeferenced_model.bounds.gpkg -crop_to_cutline -co NUM_THREADS=8 -co BIGTIFF=IF_SAFER -co BLOCKYSIZE=512 -co COMPRESS=DEFLATE -co BLOCKXSIZE=512 -co TILED=YES -co PREDICTOR=2 /datasets/code/odm_orthophoto/odm_orthophoto.original.tif /datasets/code/odm_orthophoto/odm_orthophoto.tif --config GDAL_CACHEMAX 48.95%
Using band 4 of source image as alpha.
Creating output file that is 111567P x 137473L.
Processing input file /datasets/code/odm_orthophoto/odm_orthophoto.original.tif.
Nambari -5 inaiambia tail camand kutupa mistari 5 ya mwisho ya log.
Matumizy ya camand line kwa mifano
Baadhi ya wakati tunataka kuenda ndani kidogo katika mchakato wa utafiti wa OpenDroneMap. Kwa hilitunaweza kupata kutumia mistari ya camand moja kwa moja kwenye mashine. Kwa hili, tunawza kutumia docker exec kufikia na camand line bash muonekano ndani ya mashine kwa umuhimu ufuatao:
> docker exec -ti 2518817537ce bash
root@2518817537ce:/code#
Sasa tumeingia ndani ya kundi docker na mashine itaonesha.
Safisha juu baada ya Docker
Docker haina msaada kutumia nafasi na kawaida haiondoi kufanya kazi data na mashine mchakato ukimaliza. Hii inaweza kuwa faida ikiwa tunahitaji kutumia mchakato ambao ulikatika, lakini unachukua matatizo ya kuengeza matumizi ya nafasi kwa mda. Maciej Łebkowski ana mtazamo mzuri ya vipi kuongoza kutumia nafasi iliotumika kutumia ndani ya docker.
Tumia ODM kutoka eneo lenye low-bandwidth
Nini hiki na kwa nani
Kutoka kwa Ivan Gayton's repo.
OpenDroneMap haiwezi kuwa kawada kuingizwa local inataka mashine yenye nguvu kwa mchakato wa data nyingi—kwa hivyo cloud mashine inaweza baadhi ya wakati kujibu kwa watu wanotaka kutumia. Hata hivyo nafasi ni tatizo kwa marekebisho ya kiwango cha chini. Kizuwizi hiki hakiwezi kuondoa tatizo moja kwa moja, bali njia zifuatazo zinaweza kuwa sababu za kupunguza mahitaji ya nafasi kwa kuchakata picha za ndege nyuki katika claud kutoka maeneo ya Afrika.
Hapa tutawakilisha wepesi lakini mchakato unaofanya kazi wa kutengeneza OpenDroneMap cloud mashine (sio CloudODM, kumbuka, ni cloud-based instance ya ODM ambayo unaweza kutumia kutoka kwa camand line) na tumia kuprocess kundi picha nyingi ukiwa mbali. Inahitaji ujuzi wa matumizi ya Unix camand line, ssh, Digital Ocean account (Amazon AWS inafanya kazi pia, inawezekana ni tofauti ndogo katika mpangilio), njia ya kati na kati ya usomaji Computer kwa ujumla. Ikiwa huna computer nzuri na unataka kutumia njia ya slightly setup, CloudODM ni lazima kuiangalia.
Mchakato wote huo umekusudiwa kwa mtu anerusha ndege nyuki eneo kubwa ndani ya Afrika au eneo linalofanana kutaka kuprocess data haraka wakati yupo eneo la kazi. Kwa hio itasaidia kazi iliopangwa kwa kupunguza nafasi/ kusafirisha data, kuliko njia rahisi ya kutumia ODM.
Njia
Kuingiza
Tengeneza Digital Ocean droplet yenye ukubwa angalau 4GB ya RAM. Ambayo makisio gharama ni $20/mwezi, chini ya 4GB na haitakubali kuingia. Wakati ukiwasha ODM process tutapunguza kuwa ukubwa na cloud mashine ya gharama, Lakini wakati ikitumika unaweza kupunguza kwa droplet ya pili rahisi zaidi ambayo ina gharama ya $10/mwezi (ni droplet rahisi zaidi, at $5/mwezi , utatumia kwa nafasi ndogo ambayo huwezi kuirudisha mwanzo).
Lazima Ubuntu 18.04 instance kuhakikisha uwiano
Tengeneza mtumiaji kwa sudo privileges" Digital Ocean’s insanely good documentation itasaidia kujua. Katika kesi yetu tutaandaa mtumiaji aneitwa
odm, unganisha na kupitia camandssh odm@xxx.xxx.xxx.xxx( ambapo x's ina maana IPv4 anuani katika server yako). Ikiwa unataka kufata huu mfano kwa karibu , do tumia tumia jinaodm; kisha path yako itakuwa/home/odm/ODM/na itafanana na mifano yote katika kitabu hichi.Nenda kutumia
sudo apt updatenasudo apt upgradekuhakikisha server sio hatari wila kuapdate, lakini endelea kutumia Ubuntu 18.04.
Download and install ODM on it from the ODM Github with the following commands:
git pull https://github.com/OpenDroneMap/ODM.git
cd ODM
bash configure.sh install
Ikiwa utafanya hivi kuanzia kawaida home folder ya user yako (i.e
odm) sehemu ya kuingiza itakua/home/odm/ODM(kiufupikama~/ODM/).Kuna baadhi ya kibadilika mazingira zinatakiwa kuwekwa. Fungua ~/.bashrc file katika mashine yako na uingize mistari 3 ifuatayo mwisho (From the ODM github). File linaweza kufunguka pamoja na
nano ~/.bashrc(au katika programu unayochapa ndani lieu of nano). Kuwa na ukahika kuweka/home/odm/kwa anuani sahihi hadi katika eneo ambayo itaichambua OpenDroneMap ikiwa hukufanya kila kitu kwa uhakika kama kwenye mfano wetu (Mfano ukitumia jina la mtumiaji katika mipangilio ya server).
export PYTHONPATH=$PYTHONPATH:/home/odm/ODM/SuperBuild/install/lib/python2.7/dist-packages
export PYTHONPATH=$PYTHONPATH:/home/odm/ODM/SuperBuild/src/opensfm
export LD_LIBRARY_PATH=$LD_LIBRARY_PATH:/home/odm/ODM/SuperBuild/install/lib
Zingatia kwamba ODM github readme imekusanya makosa mepesi, ingiza anuani jina itakuwa ODM, sio OpenDroneMap (utaona hiyvo ukiwa utalinganisha na maeleza hapo juu kwa moja ndani ya ODM GitHub).
Kwa ajili ya kuepusha kutofanya kazi ikiwa split-merge itakataa kuonesha file lake, tunaengeza mistari ifuatayo kwa
~/.bashrc( weka sawa kama uliweka tofauti na mfano wetu):
export PYTHONPATH=$PYTHONPATH:/home/odm/ODM/
export PATH=$PATH:/home/odm/ODM/
Sasa utahitaji hard drive ya pili ("nafasi" katika Digital Ocean jargon) inatosha kutengeneza project yako. Sheria ya thumb inaonesha kuwa mara 10 ya nafasi ya data picha, tumepata 100GB hadi kufikia ukubwa wa 1000GB (ukimaliza kurun unaweza kusafisha nafasi kubwa , lakini inahitajika kumaliza mchakato wote). Panga hadi nafasi ikifika, weka katika droplet yako, na configure hio nafasi uitakayo (katika mfano huu tunapanga ndani ya
/mnt/odmdata/).
Kuandaa data na project
Sasa peleka picha zako ndani ya server. Unaweza kutumia Secure Copy (scp) Mfano:
scp -r /path/to/my/imagefolder odm@xxx.xxx.xxx.xxx:/mnt/odmdata/.
Muundo wa Anuani
ODM inahitaji kuandaliwa nafasi ya orodha ndani ya mshine. Nafasi ngumu ni kuingiza folder (Ikiwa utahifadhi kama hapo juu ni "/home/odm/ODM/) na folder la project (i.e. /mnt/odmdata/myproject/)
ODM settings.yaml file inaonesha anuani kuu iliokusanya project yote. Hivi ndivyo ilivyo katika msatari wa anuani project settings.yaml file (inachanganya kidogo, hii ni anuani yenyewe parent ya anuani ya kila project, ambayo ataoneshwa na jina la project ukiita ODM). hariri settings.yaml na weka
/mnt/odmdata/, ambayo katika kesi hii katika nafasi tuliotengeneza. Anuani ya project husika imetengenezwa na hilo.Individual project directories, i.e.
/mnt/odmdata/myproject/contain the gcp_list.txt file, the image_groups.txt file, and the images folder for each project.Folder la picha, i.e
/mnt/odmdata/myproject/images/linakuwa na picha zote. Ikiwa utarekebisha kama hivi, picha hazitakopiwa tena kwa sababu tayari zipo kwenye anuani ambayo ODM inaitaka.Badilisha settings.yaml kurahisisha anuani kuu ya file project (katika kesi kama hii nafasi tuliotengeneza,
/mnt/odmdata/). Hakikisha picha zipo katika sehemu husika, i.e/mnt/odmdata/myproject/imagesna mafile mengine ya ziada (gcp_list.txt and image_groups.txt) imo katika semu ya folder/mnt/odmdata/myproject/Ikiwa una picha katika mafolder tofauti kwa kila mabloki AOI au flight (ikiwa mpangilio wa flight zako utapangika) unaweza kutengeneza picha kwenye file image_groups.txt pamoja na
for i in *; do cd $i; for j in *; do echo \"$j $i\" >> ../$i.txt; done; cd ../; done;andcd ../,for i in myproject/*.txt; do cat $i >> image_groups.txt; done;. Hio itatengenea file na "group name" baada kila moja (kwa kesi hii itakuwa rahisi kuandika jina la folder llkotoka). Kisha ondosha file zote za picha katika anuani moja inayoitwa images ndani ya anuani ya project dir (kwa/mnt/odmdata/myproject/images/). file la image_groups.txt litaruhusu ODM kujua kila picha itokapo kutoka kundi moa,hata ikiwa zimetoka katika anuani moja.
Kubadilisha droplet, kuvuta pini, pekua
Zima na badilisha mashine yako kwa mpangilio maalum wa CPU na lkiasi cha kumbukumbu. Natumia memory-optimized mashine kiasi 24 vCPUs na 192GB ya RAM (ghara yake ni kiasi $1.60/hr ambayo itaengeza haraka, ni juu $1000/mwezi). Washa upya na fanya kazi kwa haraka ili usipoteze mda big-droplet.
Zindua mchakato wa ODM kupitia ssh kutumia nohup (kwa hiyo ikiwa utaikata, mchakato utakatika)
Badala ya kutumia kioo cha GNU kuzindua mchakato kutoka kwenye kioo ambayo haitasimama hana mawasiliano yakikatika; Zindua
screen, na tumia<ctrl> a <ctrl> dkwenye detach,screen -rhadi re-attach. Lakini kutumia haitakupa file la log ya muonekano wa console isipokuwa utafanya kitu maalum kusanifu hili, ikiwa nohup itakupa file pamoja na muonekano wote wa console, ikiwemo ujumbe wa makosa, bure.Zingatia kama 2020-03 maneno ya kawaida
python run.py -i /path/to/image/folder project_nameseems not to work; the-ior--imageparameter inasababisha kosa la ajabu. Kwa hio tunafuta -i paramiter, na kutegemea mstari wa anuani ya project katika folder settings.yaml kuongoza ODM katika nafsi husika.Sasa tumia (ikiwemo split-merge):
nohup python run.py myproject --split 1 --split-overlap 0 --orthophoto-resolution 5 --dem-resolution 15 --pc-las --dsm
Alama ODM katika folder (kwa Mfano)
/mnt/odmdata/myproject/. Kutoa image_groups.txt na gcp_list.txt zinapatikana ndani ya folder, picha zinapatikana/mnt/odmdata/myproject/images/, na anuani project ndani ya settings.yaml ni/mnt/odmdata/haitapoteza muda na nafasi ya kukupia picha.Zingatia kwamba unakisia utakua na file image_groups.txt. Ukikosa hilo``-split-overlap 0`` litaleta athari, na
--split lbila shaka mchanganyiko halisi wa namba utakataliwa baada ya image_groups.txt file kuonekana (Nafikiria ni kawaida kuzuiya makundi mangapiyatavunjwa kwa seti ya picha ndani yake, lakini kwa kesi yetu tunajaaliapicha zishapangwa kwa uweledi). Ikiwa huna data seti nyingi (>1000 picha). Acha kuchagua--splitna--split-overlap.Fuata muoendelezo kwa kutumia tail (ili uweze kujua ikimaliza)
tail -f nohup.out
Unaweza kuangalia htop (ili kupata kujua matumizi uliotumia kwa maana siku za usoni unaweza kuongeza ukubwa wa mashine)
Baada kumaliza (kisia utachukua mda mkubwa)
Mara tu processing ikimaliza, zima mashine na rudisha chini kwa uwezo mdogo.
Washa mashine ya kuhifadhi, na ingia ndani kutumia ssh.
Ikiwa unataka kuhifadhi nafasi uliopakua, unaweza compress orthophoto kutumia GDAL. Usiingize muonekano, fanya hivyo kwenye computer yako kuepusha kufanya file kuwa kubwa kabla ya kupakua.
gdal_translate -co COMPRESS=JPEG -co PHOTOMETRIC=YCBCR -co TILED=YES -b 1 -b 2 -b 3 -mask 4 --config GDAL_TIFF_INTERNAL_MASK YES /path/to/original/filename.extension /path/to/output.tif
Pakua tumia scp:
scp odm@xxx.xxx.xxx.xxx:/mnt/odmdata/myproject/odm_orthophoto/odm_orthophoto.tif(au chukua compressed version uliotengeneza mwisho)Mara tu ukipata file kwenye computer yako, unaweza kuumia QGIS kuingiza muonekano (“pyramids”) au tumia GDAL command
gdaladdo -r average /path/to/image.tif 2 4 8 16 32 64 128 256 512 1024.Unaweza kuhifadhi odm_texturing, odm_georeferencing, na odm-dem Mafile tumia tar kwa urahisi wa kupakua kwa sehemu moja (na pengine ndogo zaidi).
tar -zcvf archivename /path/to/folder
Advanced
Kurekebisha Camera
Kurekebisha Camera ni changamoto maalum pamoja na thamani ya camera. mabadiliko ya hali joto, mtetemeko, muelekeo, na na vitu vyengine vinavyoweza kuathiri data itakayopatikana. Automatic au matengenezo binafsi yanaweza kufanywa na kutakiwa na drone ukiruka, lakini inategemea na njia itakayopita ndege, marekebisho ya automatic haiwezi kuondosha njia zote kutoka mwanzo. James and Robson (2014) katika kitabu chao Mitigating systematic error in topographic models derived from UAV and ground‐based image networks imeonyesha jinsi kupunguza makosa kweye marekebisho binafsi.
Athatri za shimo katika point cloud kwa makundi ya picha zaidi ya 13,000 zilizokusanywa na benki ya dunia katika eneo la mafuriko Msimbasi Basin, Dar es Salaam, Tanzania.
Kupunguza athari,kuna njia kidogo lakini njia rahisi ni kama: rusha njia mbili tofauti kwa 20°, kuliko kutumia nadir kamera (kuelekeza pont chini), tumia ambayo itainamisha camera kwa 5°.
As this approach takes longer than traditional imaging, pilots and teams may apply this technique to a smaller area and use the collected data to optimize future flights. OpenDroneMap can generate a calibration file called cameras.json from a small sample flight. The calibration file can be used for future flights, mitigating the bowling effect without sacrificing efficiency.
Vyenginevyo, njia za majaribio yafuatayo zinaweza kutumika: rusha drone kwa kupishanisha picha kidogo, lakini miruko crossgrid miwili (wakati mwengine huitwa crosshatch) iliotenganishwa kwa 20° na 5° moja kwa moja ikiangalia camera.
Crossgrid asilimia za kupishana zinaweza kuwa ndogo kuliko flight sambamba. Kwa kupata matukio mazuri ya 3D, utatakiwa 68% za kupishana na ubavuni kushabihiana na 83% kupishana na ubavuni.
Kupata matokeo ya 2D na 2.5D (digital elevation model), unatakiwa 42% mpishano na msimamo kwa mshabihiano 70% overlap na sidelap.
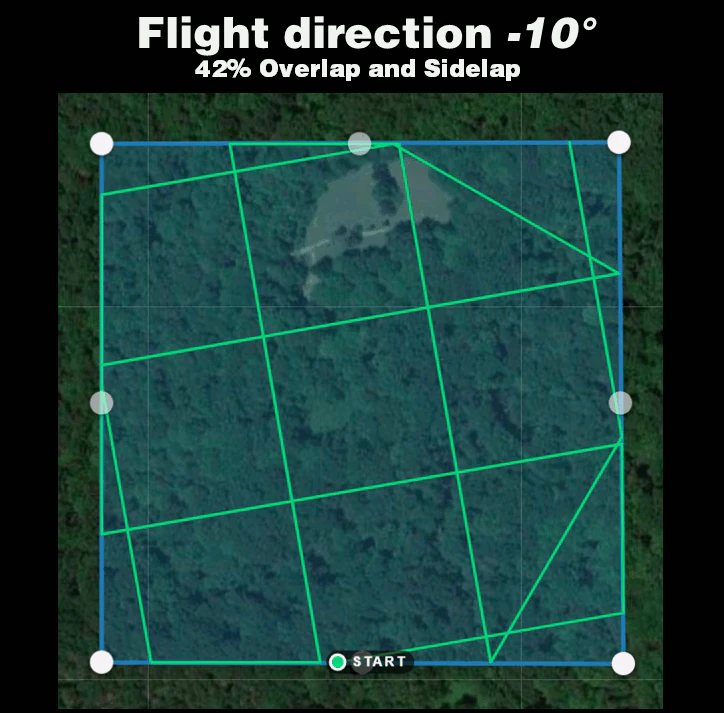
Mistari ya kusimama iliyopishana ya njia ya kupitisha ndege pia inaongeza usahihi, lakini kidogo kwa hiyo camera iangalie moja kwa moja na 5°.
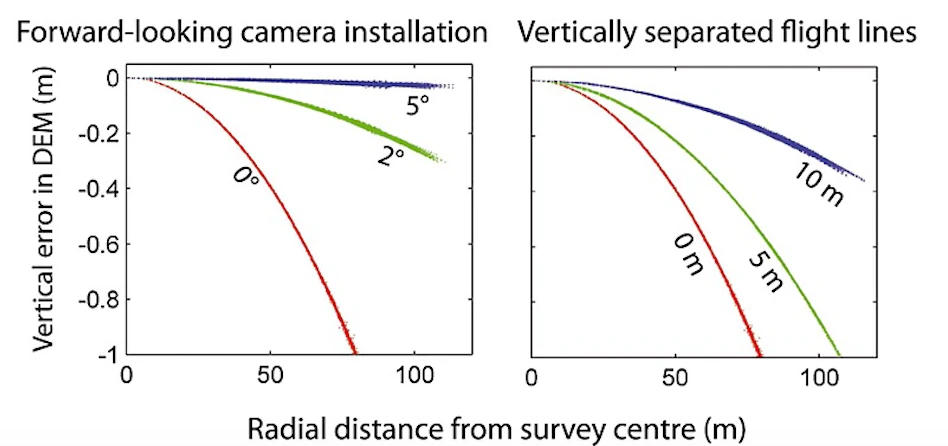
Kutoka James na Robson (2014),`CC BY 4.0 <https://creativecommons.org/licenses/by/4.0>`_
Using Image Masks
Starting from ODM 2.0 people can supply image masks to inform the software to skip reconstruction over certain areas. This is useful for cases where the sky was accidentally included in the input photos from oblique shots, or simply to limit the reconstruction of a single subject.
To add a mask, simply create a new black and white image of the same dimension as the target image you want to mask (you can use a program such as GIMP to do this). Color in black the areas to exclude from the reconstruction.
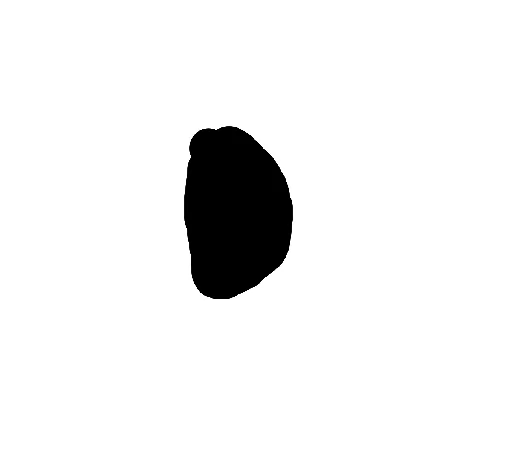
Name your file:
<filename>_mask.JPG
For example, DJI_0018.JPG can have a mask by creating a DJI_0018_mask.JPG file and include that in the list of images. You can use .JPG, .PNG, .BMP and .TIF formats for image masks.
Using Singularity
Singularity is another container platform able to run Docker images. Singularity can be run both on local machins and in instances where the user does not have root access. Instances where a user may not have root privlidges include HPC clusters and cloud cluster resources. A container is a single file without anything else to install.
Build Singularity image from Docker image
Singularity can use Docker image to build SIF image.
For latest ODM Docker image (Recommended) :
singularity build --disable-cache -f odm_latest.sif docker://opendronemap/odm:latest
For latest ODM GPU Docker image :
singularity build --disable-cache -f odm_gpu.sif docker://opendronemap/odm:gpu
Using Singularity SIF image
Once you have used one of the above commands to download and create the odm_latest.sif image, it can be ran using singularity. Place your images in a directory named “images” (for example /my/project/images) , then simply run :
singularity run --bind /my/project:/datasets/code odm_latest.sif --project-path /datasets
Like with docker, additional Options and Flags can be added to the command :
singularity run --bind /my/project:/datasets/code \
--writable-tmpfs odm_latest.sif \
--orthophoto-png --mesh-octree-depth 12 --dtm \
--smrf-threshold 0.4 --smrf-window 24 --dsm --pc-csv --pc-las --orthophoto-kmz \
--matcher-type flann --feature-quality ultra --max-concurrency 16 \
--use-hybrid-bundle-adjustment --build-overviews --time --min-num-features 10000 \
--project-path /datasets
ClusterODM, NodeODM, SLURM, with Singularity on HPC
You can write a SLURM script to schedule and set up available nodes with NodeODM for the ClusterODM to be wired to if you are on the HPC. Using SLURM will decrease the amount of time and processes needed to set up nodes for ClusterODM each time. This provides an easier way for user to use ODM on the HPC.
To setup HPC with SLURM, you must make sure SLURM is installed.
SLURM script will be different from cluster to cluster, depending on which nodes in the cluster that you have. However, the main idea is we want to run NodeODM on each node once, and by default, each NodeODM will be running on port 3000. Apptainer will be taking available ports starting from port 3000, so if your node's port 3000 is open, by default NodeODM will be run on that node. After that, we want to run ClusterODM on the head node and connect the running NodeODMs to the ClusterODM. With that, we will have a functional ClusterODM running on HPC.
Here is an example of SLURM script assigning nodes 48, 50, 51 to run NodeODM. You can freely change and use it depending on your system:
#!/usr/bin/bash
#source. bashrc
#SBATCH --partition=8core
#SBATCH --nodelist-node [48,50, 51]
#SBATCH --time 20:00:00

cd SHOME
cd ODM/NodeODM/

#Launch on Node 48
srun --nodes-1 apptainer run --writable node/ &

#Launch on node 50
srun --nodes-1 apptainer run --writable node/ &

#Launch on node 51
srun --nodes=1 apptainer run --writable node/ &
wait
You can check for available nodes using sinfo:
sinfo
Run the following command to schedule using the SLURM script:
sbatch sample.slurm
You can also check for currently running jobs using squeue:
squeue -u $USER
Unfortunately, SLURM does not handle assigning jobs to the head node. Hence, if we want to run ClusterODM on the head node, we have to run it locally. After that, you can connect to the CLI and wire the NodeODMs to the ClusterODMs. Here is an example following the sample SLURM script:
telnet localhost 8080
> NODE ADD node48 3000
> NODE ADD node50 3000
> NODE ADD node51 3000
> NODE LIST
You should always check to make sure which ports are being used to run NodeODM if ClusterODM is not wired correctly.
It is also possible to pre-populate nodes using JSON. If starting ClusterODM from apptainer or docker, the relevant JSON is available at docker/data/nodes.json. Contents might look similar to the following:
[
        {"hostname":"node48","port":"3000","token":""},
        {"hostname":"node50","port":"3000","token":""},
        {"hostname":"node51","port":"3000","token":""}
]
After finish hosting ClusterODM on the head node and finish wiring it to the NodeODM, you can try tunneling to see if ClusterODM works as expected. Open another shell window in your local machine and tunnel them to the HPC using the following command:
ssh -L localhost:10000:localhost:10000 user@hostname
Replace user and hostname with your appropriate username and the hpc address. Basically, this command will tunnel the port of the hpc to your local port. After this, open a browser in your local machine and connect to http://localhost:10000. Port 10000 is where ClusterODM's administrative web interface is hosted at. This is what it looks like:

Here you can check the NodeODMs status and even add or delete working nodes.
After that, do tunneling for port 3000 of the HPC to your local machine:
ssh -L localhost:3000:localhost:3000 user@hostname
Port 3000 is ClusterODM's proxy. This is the place we assign tasks to ClusterODM. Once again, connect to http://localhost:3000 with your browser after tunneling. Here, you can Assign Tasks and observe the tasks' processes.

After adding images in this browser, you can press Start Task and see ClusterODM assigning tasks to the nodes you have wired to. Go for a walk and check the progress.
Development and testing of ODM
Development and testing of code changes can be difficult. The simplest way to do so is modify the code and rebuild docker images from source, much as documented in the README for the ODM repository.
However, having to do a full docker rebuild for each change is time consuming and wasteful. What might be better is to have a dedicated, long running node that allows us to test out changes in near real time.
Fork and clone repository
Set up local NodeODM docker instance
Modify code
Connect to NodeODM instance
Install and use changes
Fork and clone repository
First, let's fork the ODM repo, and checkout a new branch locally that will function as our development branch.
git checkout -b my_clever_new_change
# Switched to a new branch 'my_clever_new_change'
Set up local NodeODM docker instance
Next, we will set up a NodeODM instance with a locally mounted volume that points to our development branch of ODM
docker run -d --restart unless-stopped -p 3000:3000 -v /path/to/cloned/ODM/repository/data:/code opendronemap/nodeodm
Modify code
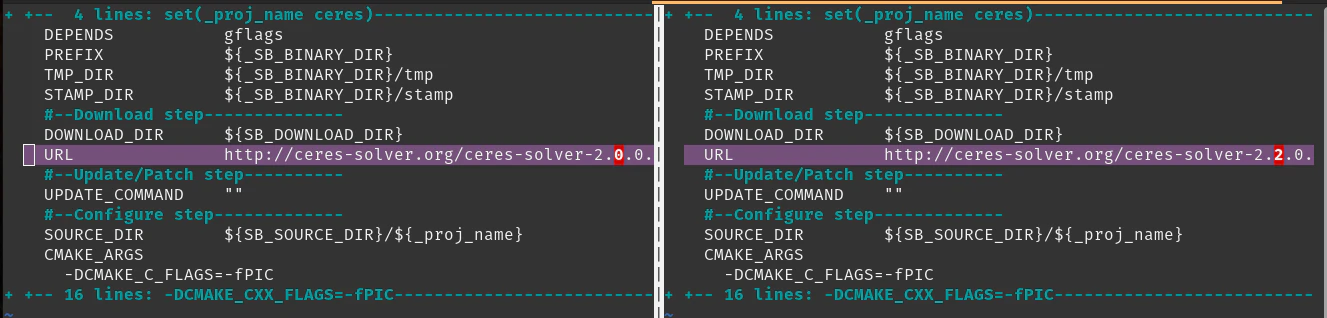
For our test today, we will attempt to upgrade Ceres Solver to version 2.2.0. Most external libraries like Ceres can be found in the Superbuild directory. In this case we edit SuperBuild/cmake/External-Ceres.cmake, and set it to use version 2.2.0
Now that we've made that small, but substantive change, we need to rebuild Ceres on the docker image for testing.
Connect to NodeODM instance
Let us find out our container name, in case we forgot:
docker ps
CONTAINER ID   IMAGE                        COMMAND                  CREATED         STATUS         PORTS                                       NAMES
c997a4c5611b   opendronemap/nodeodm         "/usr/bin/node /var/…"   2 minutes ago   Up 2 minutes   0.0.0.0:3000->3000/tcp, :::3000->3000/tcp   affectionate_yalow
Now that we know the container name, we will connect to that instance using docker exec as follows:
docker exec -it affectionate_yalow bash
Install and use changes
Let us get the environment prepared for our testing:
root@c997a4c5611b:/var/www# cd /code
./configure.sh install
mkdir /code/SuperBuild/build
cd /code/SuperBuild/build
Next we can rebuild Ceres.
cmake ../.
make -j$(nproc) ceres
        ...
-- Up-to-date: /code/SuperBuild/install/include/ceres
-- Up-to-date: /code/SuperBuild/install/include/ceres/internal
-- Installing: /code/SuperBuild/install/include/ceres/internal/config.h
-- Installing: /code/SuperBuild/install/include/ceres/internal/export.h
-- Installing: /code/SuperBuild/install/include/ceres/internal/miniglog/glog/logging.h
-- Installing: /code/SuperBuild/install/lib/cmake/Ceres/CeresTargets.cmake
-- Installing: /code/SuperBuild/install/lib/cmake/Ceres/CeresTargets-release.cmake
-- Installing: /code/SuperBuild/install/lib/cmake/Ceres/CeresConfig.cmake
-- Installing: /code/SuperBuild/install/lib/cmake/Ceres/CeresConfigVersion.cmake
[100%] Completed 'ceres'
[100%] Built target ceres
Success! Now we can either run ODM directly inside this container, use the NodeODM interface to process data, or connect in with OpenDroneMap Desktop for additional testing.
Learn to edit and help improve this page!