دروس
ستجد أدناه تعليمات لبعض حالات الاستخدام الشائعة.
إنشاء Orthophotos عالية الجودة
بدون أي تعديلات في المعلمات ، يختار ODM حل وسط جيد بين الجودة والسرعة واستخدام الذاكرة. إذا كنت ترغب في الحصول على نتائج عالية الجودة ، فأنت بحاجة إلى تعديل بعض المعلمات:
Resolution '' هي دقة صورة Orthophoto بالسنتيمتر / بكسل. إنقاص هذه القيمة للحصول على نتيجة دقة أعلى.
"--ignore-gsd" هي علامة توجه تعليمات ODM لتخطي بعض الذاكرة وتحسينات السرعة التي تؤثر بشكل مباشر على الصورة. سيؤدي استخدام هذه العلامة إلى زيادة وقت التشغيل واستخدام الذاكرة ، ولكن قد ينتج عنه نتائج أكثر وضوحًا.
يجب زيادة
-texturing-nadir-weightإلى29-32في المناطق الحضرية لإعادة بناء حواف أفضل للأسقف. يجب تخفيضها إلى "0-6" في المناطق العشبية / المسطحة.يجب تعيين
--texturing-data-termعلى "المنطقة" في مناطق الغابات.يجب زيادة
mesh-size--إلى300000-600000و--mesh-octree-depthيجب زيادتها إلى10-11في المناطق الحضرية لإعادة إنشاء مباني / أسقف أفضل.
معايرة الكاميرا
تعد معايرة الأميرة تحديًا خاصًا مع كاميرات السلع. يمكن أن تؤثر التغيرات في درجات الحرارة والاهتزازات والتركيز والعوامل الأخرى على المعلمات المشتقة مع تأثيرات كبيرة على البيانات الناتجة. المعايرة التلقائية أو الذاتية ممكنة ومرغوب فيها مع رحلات الطائرات بدون طيار ، ولكن اعتمادًا على نمط الرحلة ، قد لا تؤدي المعايرة التلقائية إلى إزالة كل التشويه من المنتجات الناتجة. جيمس وروبسون (2014) في ورقتهما بعنوان `` التخفيف من الخطأ المنهجي في النماذج الطبوغرافية المشتقة من الطائرات بدون طيار وشبكات الصور الأرضية <https://onlinelibrary.wiley.com/doi/full/10.1002/esp.3609> "_ معالجة كيف لتقليل التشويه من المعايرة الذاتية.
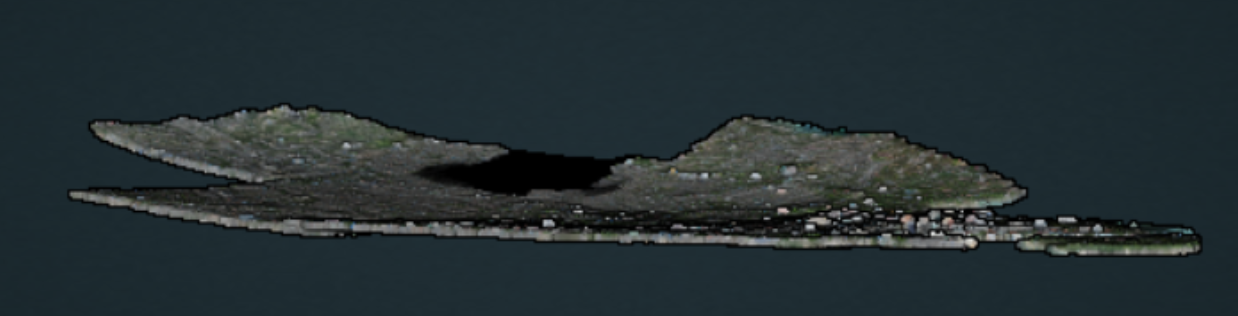
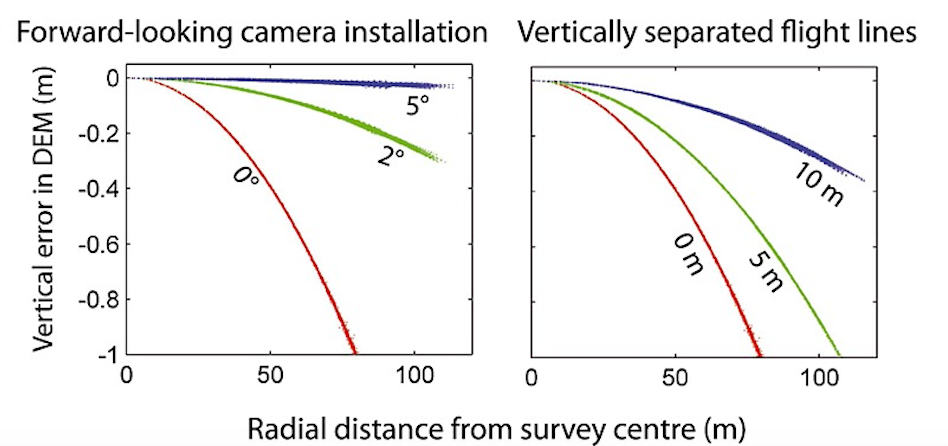
Bowling effect on point cloud over 13,000+ image dataset collected by World Bank Tanzania over the flood prone Msimbasi Basin, Dar es Salaam, Tanzania.
للتخفيف من هذا التأثير ، هناك عدد قليل من الخيارات ولكن أبسطها على النحو التالي: حلّق بنمطين مفصولين بـ 20 درجة ، وبدلاً من أن يكون لديك كاميرا (إشارة مستقيمة لأسفل) ، استخدم واحدًا يميل إلى الأمام بمقدار 5 درجات.
نظرًا لأن هذا النهج في الطيران يمكن أن يستغرق وقتًا أطول من الرحلات النموذجية ، يمكن للطيار أو الفريق أن يطير في منطقة صغيرة باستخدام النهج أعلاه. ستقوم OpenDroneMap بإنشاء ملف معايرة يسمى camera.json يمكن استيراده بعد ذلك لاستخدامه لمعايرة رحلة أخرى يتم نقلها بكفاءة أكبر.
بدلاً من ذلك ، يمكن تطبيق الطريقة التجريبية التالية: حلّق بتداخل أقل بكثير ، لكن رحلتين * متصالبتين * (تسمى أحيانًا التقاطع المائل) مفصولتين بزاوية 20 درجة مع كاميرا أمامية 5 درجات.
مكن أن تكون نسب التداخل بين خطوط الشبكة أقل من الرحلات المتوازية. للحصول على نتائج جيدة ثلاثية الأبعاد ، ستحتاج إلى تداخل 68٪ و sidelap لما يعادل 83٪ تداخل و sidelap.
للحصول على نتائج جيدة ثنائية الأبعاد و 2.5 D (نموذج الارتفاع الرقمي) ، ستحتاج إلى 42٪ تداخل و sidelap للحصول على 70٪ تراكب و sidelap مكافئ.
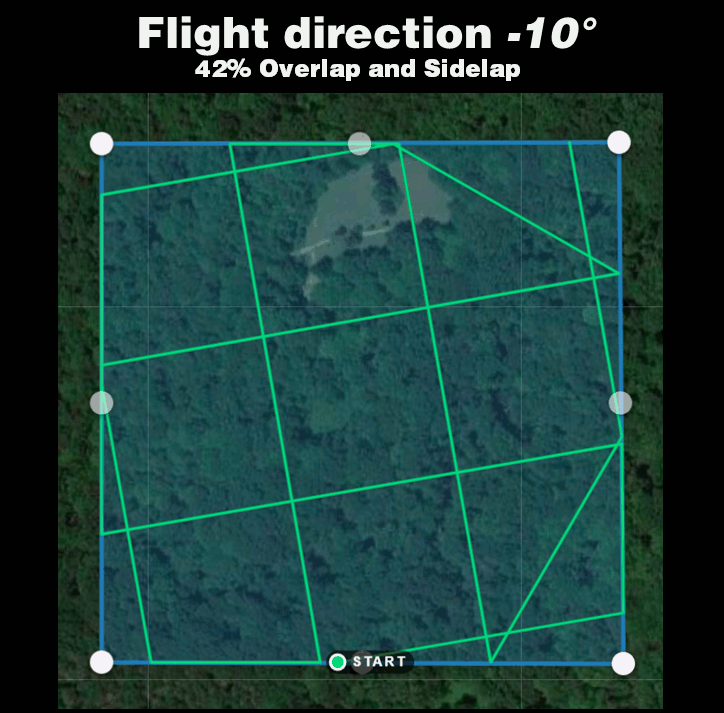
كما تحسن خطوط الطيران المنفصلة عموديًا الدقة ، ولكنها أقل دقة من الكاميرا التي تواجه الأمام بمقدار 5 درجات.
من James and Robson (2014), CC BY 4.0
إنشاء نماذج الارتفاعات الرقمية
بشكل افتراضي لا يُنشئ ODM DEMs. لإنشاء نموذج تضاريس رقمي ، تأكد من تمرير علامة "--dtm". لإنشاء نموذج سطح رقمي ، تأكد من تمرير علامة "--dsm".
بالنسبة لتوليد DTM ، يتم استخدام مرشح مورفولوجي بسيط (smrf) لتصنيف النقاط في الأرض مقابل غير الأرض ويتم استخدام نقاط الأرض فقط. يمكن التحكم في مرشح `` smrf '' من خلال عدة معلمات:
قيمة القياس `` - smrf-scalar ''. قم بزيادة هذه المعلمة للتضاريس مع الكثير من الاختلافات في الارتفاع.
معلمة المنحدر `` - smrf-slope '' ، وهو مقياس لـ "تحمل المنحدر". قم بزيادة هذه المعلمة للتضاريس مع الكثير من الاختلافات في الارتفاع. يجب ضبطه على شيء أعلى من 0.1 وليس أعلى من 1.2.
عتبة ارتفاع "- smrf-threshold". اضبط هذه المعلمة على الحد الأدنى للارتفاع (بالأمتار) الذي تتوقعه من الكائنات غير الأرضية.
`` --smrf-window '' معلمة نصف قطر النافذة (بالأمتار) التي تتوافق مع حجم أكبر ميزة (المبنى والأشجار وما إلى ذلك) المراد إزالتها. يجب ضبطه على قيمة أعلى من 10.
يمكن أن يؤثر تغيير هذه الخيارات على نتيجة DTM بشكل كبير. أفضل مصدر للقراءة لفهم كيفية تأثير المعلمات على الإخراج هو قراءة الورقة الأصلية مرشح مورفولوجي بسيط محسن لتصنيف التضاريس لبيانات LIDAR المحمولة جواً (PDF متاح مجانًا).
بشكل عام ، فإن خيار "- smrf-threshold" له أكبر الأثر على النتائج.
SMRF جيد في تجنب أخطاء النوع الأول (عدد صغير من نقاط الأرض المصنفة خطأً على أنها غير أرضية) ولكنها "مقبولة" فقط في تجنب أخطاء النوع الثاني (عدد كبير من النقاط غير الأرضية مصنفة خطأً كأرضية). يجب أن يؤخذ هذا في الاعتبار عند إنشاء DTMs التي من المفترض أن يتم استخدامها بصريًا ، لأن الكائنات التي تم الخلط بينها وبين الأرض تبدو وكأنها قطع أثرية في DTM النهائية.
هناك معلمتان مهمتان أخريان تؤثران على توليد DEM:
"--dem-Resolution '' الذي يضبط دقة خرج DEM النقطية (سم / بكسل)
"-dem-gapfill-steps '' الذي يحدد عدد طبقات DEM التقدمية التي سيتم استخدامها. بالنسبة للمشاهد الحضرية ، يمكن أن تساعد زيادة هذه القيمة إلى "4-5" في تحقيق نتائج أفضل في الاستيفاء في المناطق التي تُركت فارغة بواسطة مرشح SMRF.
مثال على كيفية إنشاء DTM
docker run -ti --rm -v /my/project:/datasets/code <my_odm_image> --project-path /datasets --dtm --dem-resolution 2 --smrf-threshold 0.4 --smrf-window 24
Measuring stockpile volume
Fieldwork planning
Weather conditions modify illumination and thus impact the photography results. Best results are obtained with evenly overcast or clear skies. Also look for low wind speeds that allow the camera to remain stable during the data collection process. In order to avoid shadows which on one side of the stockpile can obstruct feature detection and lessen the number of resulting points, always prefer the flights during the midday, when the sun is at the nadir so everything is consistently illuminated. Also ensure that your naked eye horizontal visibility distance is congruent with the planned flight distances for the specific project, so image quality is not adversely impacted by dust, fog, smoke, volcanic ash or pollution.
Flight pattern
Most stockpile measurement jobs does not require a crosshatch pattern or angled gimbal as the resting angle of stockpile materials allows the camera to capture the entire stockpile sides. Only some special cases where erosion or machinery operations causes steep angles on the faces of the stockpile would benefit of the crosshatch flight pattern and angled camera gimbal but consider that these additional recognized features come at a cost, (in field labor and processing time) and the resulting improvements are sometimes negligible.
In most of the cases a lawn mower flight pattern is capable of producing highly accurate stockpile models.
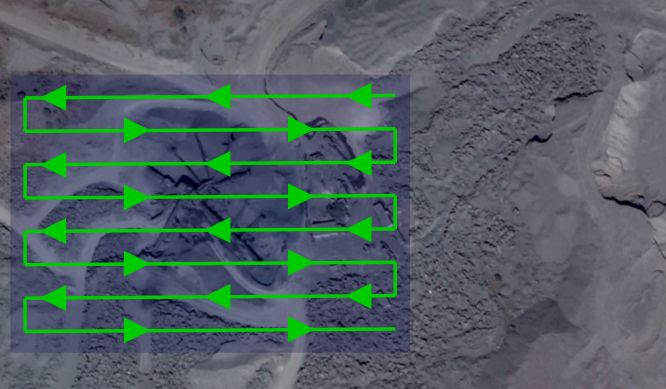
Recommended overlap would be between 75% and 80% with a sidelap in the order of 65% to 70%. It is also recommended to slightly increase overlap and sidelap as the flight height is increased.
Flight height
Flight height can be influenced by different camera models, but in a general way and in order to ensure a balance between image quality and flight optimization, it is recommended to be executed at heights 3 to 4 times the tallest stockpile height. So for a 10 meter stockpile, images can be captured at a height of 40 meters. As the flight height is increased, it is also recommended to increase overlap, so for a 40 meter height flight you can set a 65% sidelap and 75% overlap, but for a planned height of 80 meters a 70% sidelap and 80% overlap allowing features to be recognized and properly processed.
GCPs
To achieve accuracy levels better than 3%, the use of GCP’s is advised. Typically 5 distributed GCP are sufficient to ensure accurate results. When placing or measuring GCP, equipment accuracy should be greater than the GSD. Survey grade GNSS and total stations are intended to provide the required millimetric accuracy.
For further information on the use of GCPs, please refer to the Ground Control Points section.
Processing parameters
A highly accurate model can be achieved using WebODM high resolution predefined settings. Then you can further adjust some parameters as necessary.
If using ODM, these this reference values can help you configure the process settings.
--dsm: true
--dem-resolution 2.0
--orthophoto-resolution 1.0
--feature-quality high
--pc-quality high
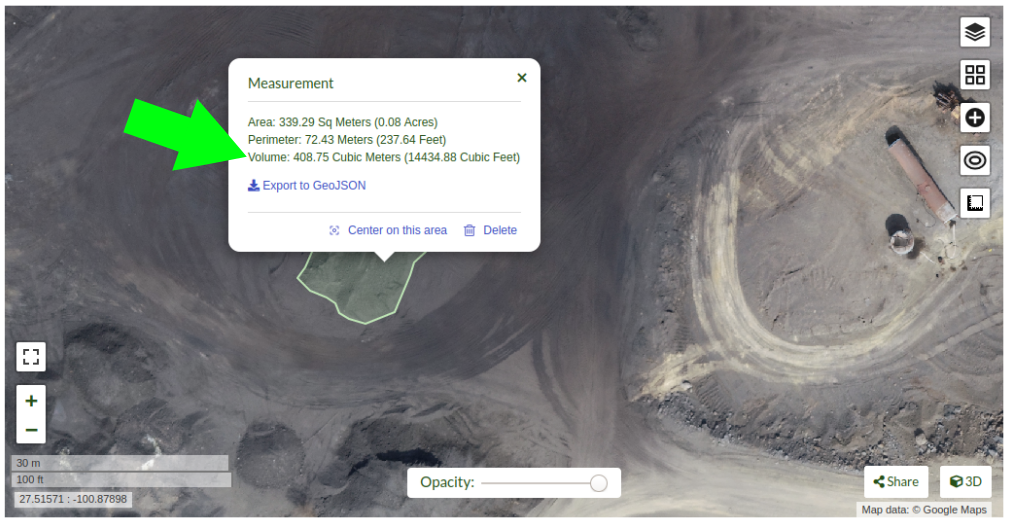
Measuring
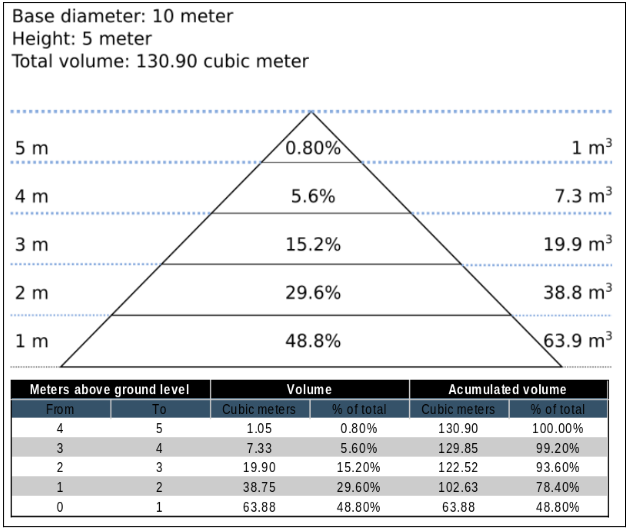
As almost 50% of the material will be found in the first 20% of the stockpile height, special care should be taken in adequately defining the base plane.
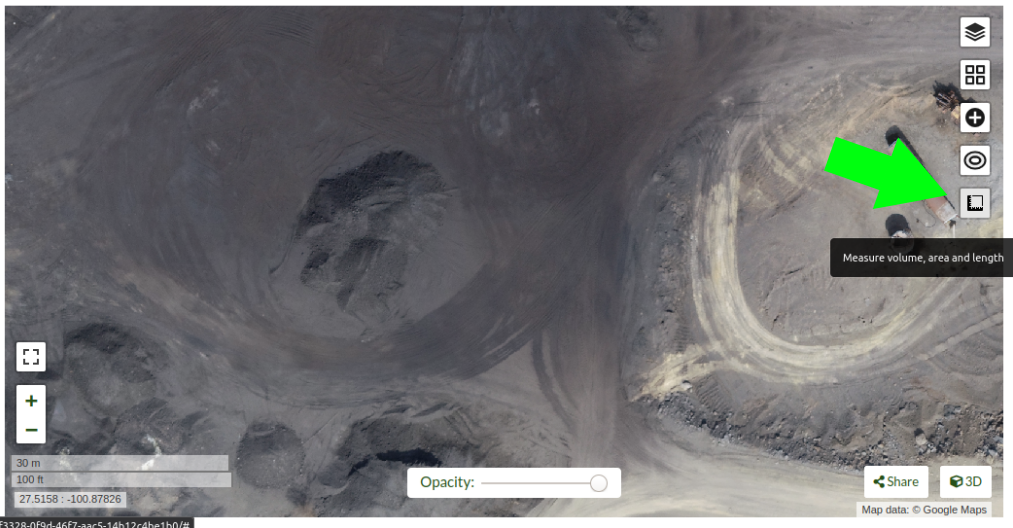
In WebODM Dashboard, clic on "view map" to start a 2D view of your project.
Once in the 2D map view, clic on the "Measure volume, area and length" button.
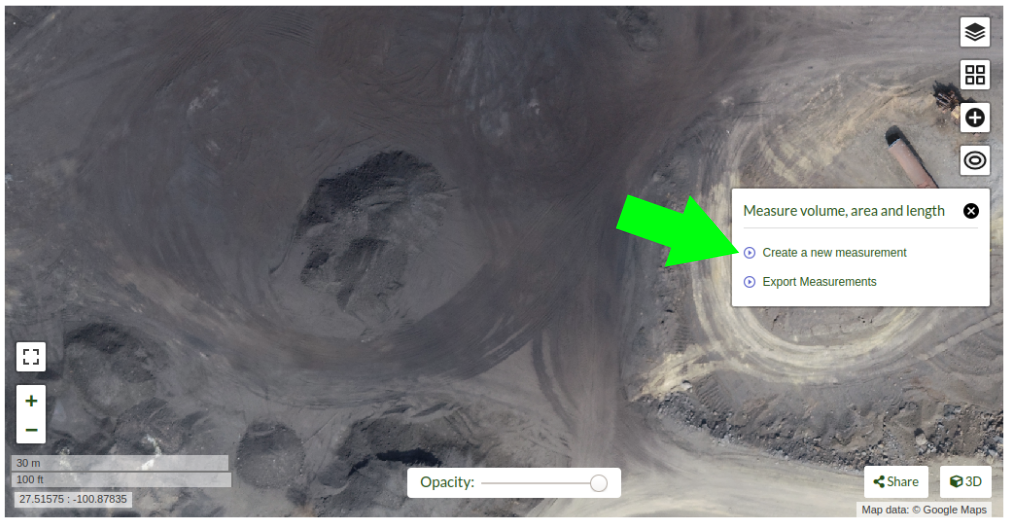
then clic on "Create a new measurement"
Start placing the points to define the stockpile base plane
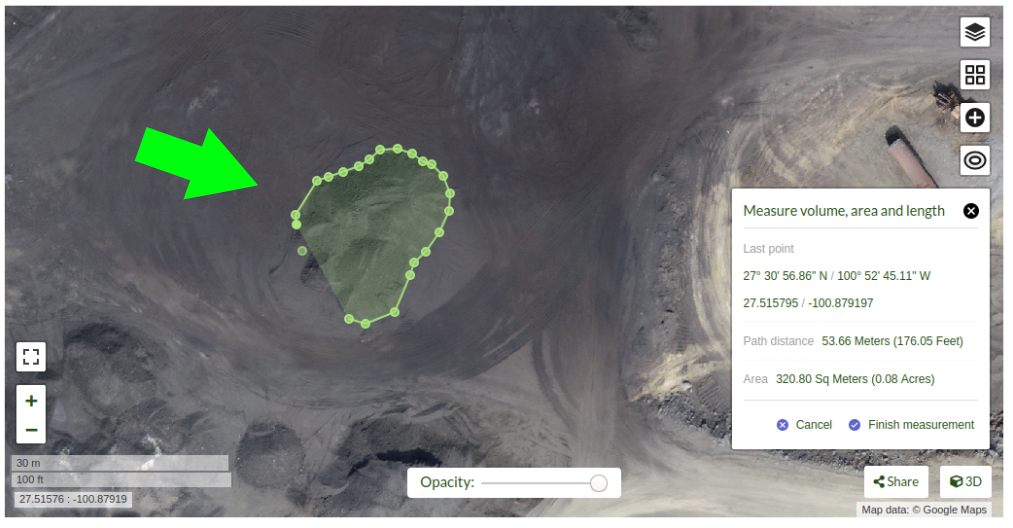
Clic on "Finish measurement" to finish the process.

Dialog box will show the message "Computing ..." for a few seconds, and after the computing is finished the volume measurement value will be displayed.
If you are using the command line OpenDroneMap you can use the dsm files to measure the stockpile volumes using other programs.
Also consider that once the limits of the stockpile are set in software like QGis, you will find there are some ways to determine the base plane. So for isolated stockpiles which boundaries are mostly visible, a linear approach can be used. While for stockpiles set in slopes or in bins, the base plane is better defined by the lowest point. Creation of a triangulated 3D surface to define the base plane is advised for large stockpiles. This is also valid for stockpiles paced on irregular surfaces.
Expected accuracy
For carefully planned and executed projects, and specially when GSD is less than 1 cm, the expected accuracy should be in the range of 1% to 2%. The resulting accuracy is comparable to the commercially available photogrammetry software and the obtained using survey grade GNSS equipment.
باستخدام Docker
نظرًا لأن العديد من المستخدمين يستخدمون عامل إرساء لنشر OpenDroneMap ، فقد يكون من المفيد فهم بعض الأوامر الأساسية من أجل استجواب حالات عامل الميناء عندما تسوء الأمور ، أو نشعر بالفضول حيال ما يحدث. Docker هي بيئة حاويات تهدف ، من بين أمور أخرى ، إلى تسهيل نشر البرامج بشكل مستقل عن البيئة المحلية. بهذه الطريقة ، فهي تشبه الأجهزة الافتراضية.
يمكن لبعض الأوامر البسيطة أن تجعل تجربة docker أفضل بكثير.
ادراج Docker ماكينات
يمكننا البدء بإدراج آلات الرصيف المتوفرة على الجهاز الحالي الذي نقوم بتشغيله على النحو التالي:
> docker ps
CONTAINER ID        IMAGE                  COMMAND                  CREATED             STATUS              PORTS                    NAMES
2518817537ce        opendronemap/odm       "bash"                   36 hours ago        Up 36 hours                                  zen_wright
1cdc7fadf688        opendronemap/nodeodm   "/usr/bin/nodejs /va…"   37 hours ago        Up 37 hours         0.0.0.0:3000->3000/tcp   flamboyant_dhawan
إذا أردنا رؤية الأجهزة التي قد لا تعمل ولكنها لا تزال موجودة ، فيمكننا إضافة علامة "-a":
> docker ps -a
CONTAINER ID        IMAGE                  COMMAND                  CREATED             STATUS                    PORTS                    NAMES
2518817537ce        opendronemap/odm       "bash"                   36 hours ago        Up 36 hours                                        zen_wright
1cdc7fadf688        opendronemap/nodeodm   "/usr/bin/nodejs /va…"   37 hours ago        Up 37 hours               0.0.0.0:3000->3000/tcp   flamboyant_dhawan
cd7b9585b8f6        opendronemap/odm       "bash"                   3 days ago          Exited (1) 37 hours ago                            nostalgic_lederberg
e31010c00b9a        opendronemap/odm       "python /code/run.py…"   3 days ago          Exited (2) 3 days ago                              suspicious_kepler
c44e0d0b8448        opendronemap/nodeodm   "/usr/bin/nodejs /va…"   3 days ago          Exited (0) 37 hours ago                            wonderful_burnell
الوصول إلى السجلات على سبيل المثال
باستخدام " CONTAINER ID" أو الاسم ، يمكننا الوصول إلى أي سجلات متاحة على الجهاز على النحو التالي:
> docker logs 2518817537ce
من المحتمل أن يكون هذا كبير الحجم غير عملي ، ولكن يمكننا استخدام حرف | للأنبوب وأدوات أخرى لاستخراج ما نحتاجه فقط من السجلات. على سبيل المثال ، يمكننا التنقل عبر السجل ببطء باستخدام الأمر more:
> docker logs 2518817537ce | more
[INFO]    DTM is turned on, automatically turning on point cloud classification
[INFO]    Initializing OpenDroneMap app - Mon Sep 23 01:30:33  2019
[INFO]    ==============
[INFO]    build_overviews: False
[INFO]    camera_lens: auto
[INFO]    crop: 3
[INFO]    debug: False
[INFO]    dem_decimation: 1
[INFO]    dem_euclidean_map: False
...
الضغط على Enter أو` Space` أو مفاتيح الأسهم أو Page Up أو` Page Down` سيساعدنا الآن في التنقل عبر السجلات. الحرف الصغير Q سيتيح لنا الهروب إلى سطر الأوامر.
يمكننا أيضًا استخراج نهاية السجلات فقط باستخدام أمر "الذيل" كما يلي:
> docker logs 2518817537ce | tail -5
[INFO]    Cropping /datasets/code/odm_orthophoto/odm_orthophoto.tif
[INFO]    running gdalwarp -cutline /datasets/code/odm_georeferencing/odm_georeferenced_model.bounds.gpkg -crop_to_cutline -co NUM_THREADS=8 -co BIGTIFF=IF_SAFER -co BLOCKYSIZE=512 -co COMPRESS=DEFLATE -co BLOCKXSIZE=512 -co TILED=YES -co PREDICTOR=2 /datasets/code/odm_orthophoto/odm_orthophoto.original.tif /datasets/code/odm_orthophoto/odm_orthophoto.tif --config GDAL_CACHEMAX 48.95%
Using band 4 of source image as alpha.
Creating output file that is 111567P x 137473L.
Processing input file /datasets/code/odm_orthophoto/odm_orthophoto.original.tif.
تخبر القيمة -5 الأمر tail بإعطائنا الأسطر الخمسة الأخيرة فقط من السجلات.
وصول سطر الأوامر إلى المثيلات
في بعض الأحيان نحتاج إلى التعمق أكثر في استكشافنا لعملية OpenDroneMap. لهذا ، يمكننا الحصول على وصول مباشر لسطر الأوامر إلى الأجهزة. لهذا ، يمكننا استخدام docker exec لتنفيذ قذيفة سطر الأوامر` bash` في الجهاز المعني على النحو التالي:
> docker exec -ti 2518817537ce bash
root@2518817537ce:/code#
الآن تم تسجيل دخولنا إلى مثيل عامل الميناء لدينا ويمكننا استكشاف الجهاز.
التنظيف بعد Docker
تمتع Docker باستخدام مؤسف للمساحة ولا يقوم افتراضيًا بتنظيف البيانات والآلات الزائدة عند اكتمال العمليات. يمكن أن يكون ذلك مفيدًا إذا احتجنا إلى الوصول إلى عملية تم إنهاؤها منذ ذلك الحين ، ولكنها تحمل عبء استخدام كميات متزايدة من التخزين بمرور الوقت. يقدم Maciej Łebkowski نظرة عامة ممتازة على كيفية إدارة الاستخدام الزائد للقرص في عامل الميناء <https://lebkowski.name/docker-volumes/> _.
Using Singularity
'Singularity <https://sylabs.io/>'_ is another container platform able to run Docker images. Singularity could be used from laptop to large HPC clusters, local university or company clusters, a single server, in the cloud... A container is a single file without anything else to install
Downloading image
Singularity can use ODM Docker container after their download. It creates .sif images
For latest ODM Docker image
> singularity pull --disable-cache docker://opendronemap/odm:latest
For latest ODM GPU Docker image
> singularity pull --disable-cache docker://opendronemap/odm:gpu
Using Singularity SIF image
As Singularity has a different way to map directories than Docker, a bash script file is a good solution to map ODM directories. Here is a linux example for ODM
images_dir=/path_to_image_dir/
name=`basename $images_dir`
output_dir=/path_to_output_directories/$name
mkdir -p $output_dir

singularity run
--bind $images_dir:/$output_dir/code/images,\
--writable-tmpfs odm_latest.sif  \
--orthophoto-png --mesh-octree-depth 12 --ignore-gsd --dtm \
--smrf-threshold 0.4 --smrf-window 24 --dsm --pc-csv --pc-las --orthophoto-kmz \
--ignore-gsd  --matcher-type flann --feature-quality ultra --max-concurrency 16 \
--use-hybrid-bundle-adjustment --build-overviews --time --min-num-features 10000 \
--project-path $output_dir
Here is a linux example for the ODM with GPU
images_dir=/path_to_image_dir/
name=`basename $images_dir`
output_dir=/path_to_output_directories/$name
mkdir -p $output_dir

singularity run
--bind $images_dir:/$output_dir/code/images,\
--writable-tmpfs odm_latest.sif  \
--orthophoto-png --mesh-octree-depth 12 --ignore-gsd --dtm \
--smrf-threshold 0.4 --smrf-window 24 --dsm --pc-csv --pc-las --orthophoto-kmz \
--ignore-gsd  --matcher-type flann --feature-quality ultra --max-concurrency 16 \
--use-hybrid-bundle-adjustment --build-overviews --time --min-num-features 10000 \
--project-path $output_dir
استخدام ODM من موقع النطاق الترددي المنخفض
ما هذا ومن هو؟
<https://www.opendronemap.org/>" __ لا يمكن دائمًا إعدادها بشكل فعال محليًا - يتطلب الأمر جهازًا قويًا إلى حد ما لمعالجة مجموعات البيانات الكبيرة - لذا يمكن أن تكون الآلة السحابية أحيانًا هي الحل للأشخاص في حقل. ومع ذلك ، فإن عرض النطاق الترددي يمثل مشكلة في العديد من الإعدادات منخفضة الدخل. لا يمكن حل هذا القيد تمامًا ، ولكن الطريقة التالية تؤدي مهمة معقولة لتقليل النطاق الترددي اللازم لمعالجة مجموعات بيانات صور الطائرات بدون طيار على السحابة من المواقع الأفريقية.
نقدم هنا عملية صعبة ولكنها عملية لإنشاء جهاز سحابة OpenDroneMap (* لا * CloudODM ، ضع في اعتبارك أنه مجرد نسخة مستندة إلى السحابة من ODM تقوم بتشغيلها من سطر الأوامر) واستخدامها لمعالجة مجموعات الصور الكبيرة عن بُعد. إنه يتطلب معرفة باستخدام سطر أوامر Unix و ssh وحساب Digital Ocean (قد يعمل Amazon AWS أيضًا ، ربما مع اختلافات طفيفة في الإعداد) ، ومستوى معتدل من معرفة الكمبيوتر العامة. إذا لم تكن على دراية بالكمبيوتر إلى حد ما وترغب في إثارة ضجة مع إعداد صعب قليلاً ، فإن "CloudODM <https://www.opendronemap.org/cloudodm/>" __ هو ما يجب أن تنظر إليه.
تستهدف العملية برمتها في الغالب شخصًا يقوم بمهام كبيرة في موقع أفريقي أو موقع مماثل يتطلع إلى معالجة البيانات في أسرع وقت ممكن بينما لا يزال في بيئة ميدانية. ولذلك ، فإنه يؤكد على سير العمل الذي يهدف إلى تقليل نقل البيانات / النطاق الترددي ، بدلاً من أبسط طريقة لتشغيل ODM.
خطوات
تثبيت
قم بإنشاء قطرة محيط رقمية مع ذاكرة وصول عشوائي بسعة 4 جيجابايت على الأقل. سيكلفك ذلك حوالي 20 دولارًا / شهريًا. من المحتمل أن يفشل التثبيت أقل من 4 غيغابايت من ذاكرة الوصول العشوائي. عندما نقوم بتشغيل عملية ODM فعليًا ، سنقوم بتغيير حجمها إلى جهاز سحابي أكبر بكثير وأكثر تكلفة ، ولكن بين الجري يمكنك تقليصها بين الجري إلى ثاني أرخص قطيرة والتي تكلف 10 دولارات فقط في الشهر (أرخص قطرة ، بسعر 5 دولارات شهريًا ، ويأتي مع محرك أقراص صغير لا يمكنك تقليصه).
يجب أن يكون نسخة Ubuntu 18.04 لضمان توافق التبعية
Create a user with sudo privileges. Digital Ocean’s insanely good documentation can help you figure this out. In our case we set up a user called
odm, so connecting to it is via the commandssh odm@xxx.xxx.xxx.xxx(where the x’s stand for the IPv4 address of your server). If you want to follow this example closely, do use the usernameodm; then your install path will be/home/odm/ODM/and will match all of the examples in this document.Go ahead and execute
sudo apt updateandsudo apt upgradeto ensure your server isn’t dangerously without updates. Make sure to stay with Ubuntu 18.04.
قم بتنزيل وتثبيت ODM عليه من ODM Github <https://github.com/OpenDroneMap/ODM> __ (عادي ، وليس WebODM) باستخدام الأوامر التالية:
git pull https://github.com/OpenDroneMap/ODM.git
cd ODM
bash configure.sh install
إذا قمت بذلك من المجلد الرئيسي الافتراضي للمستخدم (أي `` odm '') ، فسيكون المسار إلى التثبيت هو '' home / odm / ODM '' (يُختصر باسم `` ~ / ODM / '').
هناك بعض المتغيرات البيئية التي يجب تحديدها. افتح ملف ~/.bashrc على جهازك وأضف الأسطر الثلاثة 3 في النهاية (من github ODM <https://github.com/OpenDroneMap/ODM> __). يمكن فتح الملف باستخدام
nano ~/.bashrc(أو أي محرر نصوص تستخدمه بدلاً من nano). تأكد من استبدال/home/odm/بالمسار الصحيح إلى الموقع الذي قمت باستخراج OpenDroneMap إذا لم تفعل كل شيء تمامًا كما في مثالنا (على سبيل المثال إذا كنت تستخدم اسم مستخدم مختلفًا في إعداد الخادم الخاص بك) :
export PYTHONPATH=$PYTHONPATH:/home/odm/ODM/SuperBuild/install/lib/python2.7/dist-packages
export PYTHONPATH=$PYTHONPATH:/home/odm/ODM/SuperBuild/src/opensfm
export LD_LIBRARY_PATH=$LD_LIBRARY_PATH:/home/odm/ODM/SuperBuild/install/lib
لاحظ أن الملف التمهيدي لـ github الخاص بـ ODM يحتوي على خطأ بسيط ، سيكون اسم دليل التثبيت هو ODM ، وليس OpenDroneMap (سترى هذا إذا قارنت الإرشادات المذكورة أعلاه بالإرشادات الموجودة على ODM GitHub).
لمنع حدوث عطل حيث تفشل عملية الدمج المقسم في تحديد موقع الملف التنفيذي الخاص بها ، نضيف الأسطر التالية إلى
~/.bashrc(اضبط المسارات إذا قمت بإعداد الأشياء بشكل مختلف عن مثالنا):
export PYTHONPATH=$PYTHONPATH:/home/odm/ODM/
export PATH=$PATH:/home/odm/ODM/
ستحتاج الآن إلى محرك أقراص ثابت سحابي ثانٍ ("حجم" في المصطلح الرقمي للمحيط) كبير بما يكفي لإدارة مشروعك. يبدو أن القاعدة الأساسية هي 10 أضعاف حجم مجموعة صورك الخام ؛ لدينا مجموعة من الصور بحجم 100 جيجابايت وقمنا بإعداد وحدة تخزين بحجم 1000 جيجابايت (بمجرد الانتهاء من التشغيل ، يجب أن تكون قادرًا على التخلص من معظم سعة محرك الأقراص الباهظة الثمن هذه ، ولكن يلزم إكمال العملية). قم بإعداد الصوت وإرفاقه بالقطرة الخاصة بك ، و تكوين نقطة التحميل الخاصة به (في هذا المثال ، نقوم بتعيينه إلى
/mnt/odmdata/).
إعداد البيانات والمشروع
الآن ادفع صورك إلى الخادم. يمكنك استخدام Secure Copy (scp) مثل ذلك:
scp -r /path/to/my/imagefolder odm@xxx.xxx.xxx.xxx:/mnt/odmdata/.
بنية الدليل
يتطلب ODM إعداد الدلائل الموجودة على الجهاز فقط. البتات الحرجة هي مجلد التثبيت (إذا قمت بتثبيته كما هو موضح أعلاه ، فهو /home/odm/ODM/ ومجلد المشروع (i.e. /mnt/odmdata/myproject/))
يحدد ملف settings.yaml الخاص بـ ODM دليل أصل واحد يحتوي على كافة المشاريع. هذا هو ما يحدث في سطر مسار المشروع لملف settings.yaml (بشكل مثير للارتباك قليلاً ، هذا في الواقع هو الدليل * الأصل * لأدلة المشروع الفردية ، والتي يتم تحديدها بواسطة معلمة اسم المشروع عند استدعاء ODM). قم بتحرير الإعدادات. yaml وقم بتعيين معلمة project_path إلى (وفقًا لإعداد المثال الخاص بنا)
/mnt/odmdata/، والتي تشير في هذه الحالة إلى المجلد الذي أنشأناه. يتم إنشاء أدلة المشاريع الفردية في ذلك.دلائل المشروع الفردية ، أي``/mnt/odmdata/myproject/`` تحتوي على ملف gcp_list.txt ، ملف image_groups.txt ، ومجلد الصور لكل مشروع``
يحتوي مجلد الصور ، أي
`/mnt/odmdata/myproject/images/على جميع الصور. إذا قمت بإعداده على هذا النحو ، فلن تتم إعادة نسخ الصور لأنها موجودة بالفعل في الدليل الذي يريدها ODM.قم بتعديل settings.yaml لتحديد الدليل الأصلي لمجلد المشروع (في هذه الحالة المجلد الذي أنشأناه ، `` / mnt / odmdata /
). تأكد من أن الصور في الموضع الصحيح ، مثل ``/mnt/odmdata/myproject/imagesوالملفات المساعدة الأخرى (gcp_list.txt و image_groups.txt) في المجلد الجذر/mnt/odmdata/myproject/إذا كانت لديك الصور في مجلدات منفصلة لكتل أو رحلات طيران فردية (والتي ستفعلها إذا تم تنظيم إدارة رحلتك) ، فيمكنك إنشاء ملف image_groups.txt مع التعويذات
لـ i in * ؛ هل cd $ i ؛ for j in *؛ do echo "$ j $ i" >> ../$i.txt؛ فعله؛ مؤتمر نزع السلاح ../ ؛ فعل ؛وcd ../،لأني في myproject / *. txt ؛ do cat $ i >> image_groups.txt؛ فعل ؛. من المفترض أن يؤدي ذلك إلى إنشاء ملف بهيكل صحيح: قائمة بجميع ملفات الصور و "اسم المجموعة" بعد كل ملف (والذي سيكون في هذه الحالة ببساطة اسم المجلد الذي جاء منه). ثم انقل جميع ملفات الصور إلى دليل واحد يسمى الصور في دليل جذر المشروع (لذا/mnt/odmdata/myproject/images/). سيسمح ملف image_groups.txt لـ ODM بتتبع الصور التي تنتمي إلى نفس الدفعة ، على الرغم من أنها كلها في دليل واحد.
تغيير حجم القطرة ، وسحب دبوس ، والهروب
قم بإيقاف تشغيل جهازك وتغيير حجمه إلى عدد هائل من وحدات المعالجة المركزية وكمية الذاكرة المناسبة. أستخدم الجهاز المُحسّن للذاكرة مع 24 وحدة vCPU مخصصة و 192 غيغابايت من ذاكرة الوصول العشوائي (والتي تكلف حوالي 1.60 دولارًا في الساعة - والتي تضيف بسرعة ، تزيد عن 1000 دولار / شهر). إعادة التشغيل ، والبدء في العمل بسرعة حتى لا تضيع وقتًا كبيرًا.
ابدأ تشغيل عملية ODM عبر ssh باستخدام nohup (بحيث إذا تم قطع الاتصال ، فستستمر المعالجة)
بدلاً من ذلك ، يمكنك استخدام شاشة GNU لبدء العملية من جلسة الشاشة التي لن تتوقف إذا انقطع اتصالك ؛ قم بتشغيل `` الشاشة '' ، واستخدم `` <ctrl> a <ctrl> d '' لفصل "الشاشة - r" لإعادة توصيلها. لكن استخدام الشاشة لن يمنحك ملف سجل لجميع مخرجات وحدة التحكم ما لم تفعل شيئًا محددًا لالتقاط ذلك ، بينما يمنحك nohup ملفًا يحتوي على جميع مخرجات وحدة التحكم ، بما في ذلك رسائل الخطأ ، مجانًا
ملاحظة: اعتبارًا من 2020-03، يبدو أن التعطيل العادي `` python run.py -i /path/to/image/folder project_nam '' يبدو * غير * يعمل ؛ تؤدي المعلمة "-i" أو "--image" إلى حدوث خطأ غريب. لذا نسقط المعلمة -i ، ونعتمد على سطر دليل المشروع في ملف settings.yaml لتوجيه ODM إلى المكان الصحيح. الآن باستخدام (بما في ذلك الدمج المقسم):
nohup python run.py myproject --split 1 --split-overlap 0 --ignore-gsd --depthmap-resolution 1000 --orthophoto-resolution 5 --dem-resolution 15 --pc-las --dsm
هذا يشير إلى ODM في المجلد (في هذا المثال)
`/mnt/odmdata/myproject/. بشرط أن يكون ملف image_groups.txt و gcp_list.txt في هذا المجلد ، فإن الصور موجودة في/mnt/odmdata/myproject/images/، ومسار المشروع في الإعدادات. yaml هو/mnt/odmdata/لن تضيع الوقت ونسخ الصور الفضائية.لاحظ أن هذا يفترض أن لديك ملف image_groups.txt. إذا لم يكن الأمر كذلك ، فمن المحتمل أن يؤدي هذا "-split-interap 0" إلى تلاعب الأمور ، و "--plit 1" هو حرفيا رقم عشوائي سيتم تجاهله بعد تحميل ملف image_groups.txt (أعتقد ذلك تتحكم عادةً في عدد المجموعات التي تقوم بتقسيم مجموعة من الصور إليها ، ولكن في حالتنا نحن نفترض أن الصور مجمعة بالفعل بشكل معقول). إذا لم يكن لديك مجموعة بيانات كبيرة (> 1000 صورة) ، فاحذف خياري "- تقسيم" و "- تقسيم متداخل".
اتبع التقدم باستخدام الذيل (حتى تعرف متى يتم ذلك)
tail -f nohup.out
قد ترغب في مراقبة htop (للحصول على فكرة عن استخدام الموارد حتى تتمكن في المستقبل من تدوير آلة كبيرة بقدر الضرورة)
بعد الانتهاء (بافتراض أنك تعيش طويلاً)
بمجرد الانتهاء من المعالجة ، أغلق الماكينة وقم بتغيير حجمها مرة أخرى إلى الحد الأدنى للسعة غير المكلفة.
قم بتشغيل الجهاز احتياطيًا ، وقم بتسجيل الدخول عبر ssh.
إذا كنت تريد حفظ النطاق الترددي للتنزيل ، يمكنك ضغط الصورة التقويمية باستخدام GDAL. لا تضيف نظرة عامة ، افعل ذلك على جهازك المحلي لتجنب تكبير الملف قبل تنزيله.
gdal_translate -co COMPRESS=JPEG -co PHOTOMETRIC=YCBCR -co TILED=YES -b 1 -b 2 -b 3 -mask 4 --config GDAL_TIFF_INTERNAL_MASK YES /path/to/original/filename.extension /path/to/output.tif
التنزيل باستخدام scp:
scp odm@xxx.xxx.xxx.xxx:/mnt/odmdata/myproject/odm_orthophoto/odm_orthophoto.tif(أو احصل على النسخة المضغوطة التي أنشأتها في الخطوة الأخيرة)بمجرد الحصول على الملف على جهاز الكمبيوتر المحلي الخاص بك ، يمكنك استخدام QGIS لإضافة نظرة عامة ("الأهرامات") أو استخدام أمر GDAL
gdaladdo -r average /path/to/image.tif 2 4 8 16 32 64 128 256 512 1024.يمكنك أرشفة مجلدات odm_texturing و odm_georeferencing و odm-dem باستخدام tar لتسهيل عملية التنزيل في قطعة واحدة (وربما أصغر).
tar -zcvf archivename /path/to/folder
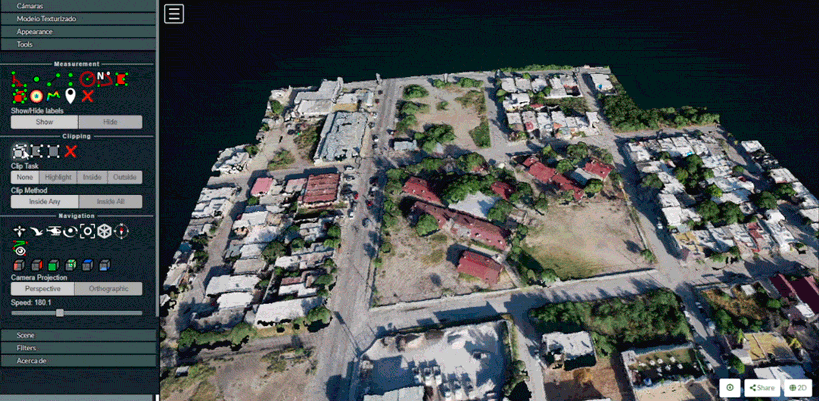
Using Potree 3D viewer module on WebODM
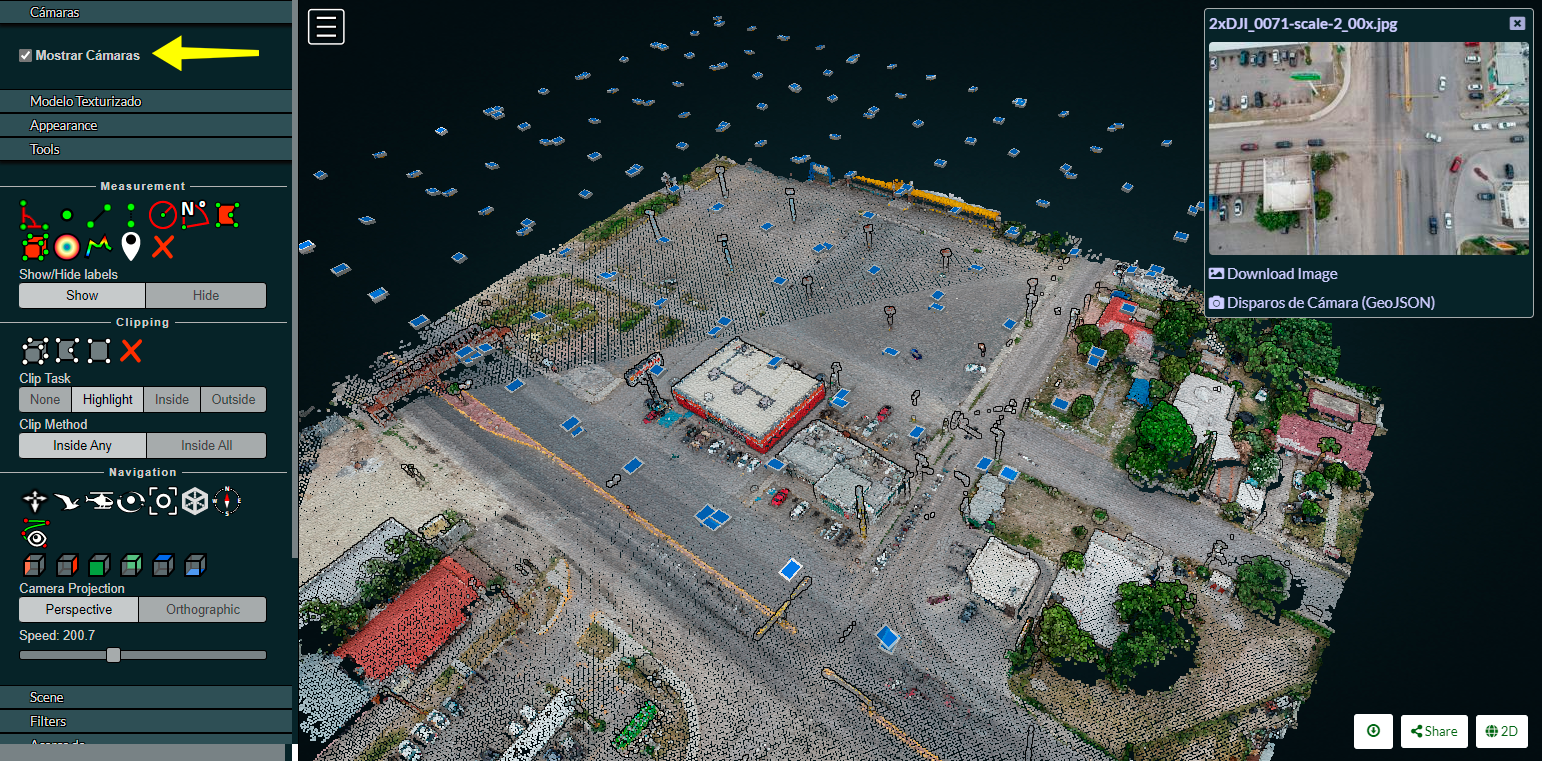
Cameras
Activate this function to display camera positions.
You can also click in the camera icon to display single images in a frame on the upper right corner. A click on the image frame toggles into full screen mode.
Within the image frame there are links to download the image and the GeoJSON camera file.
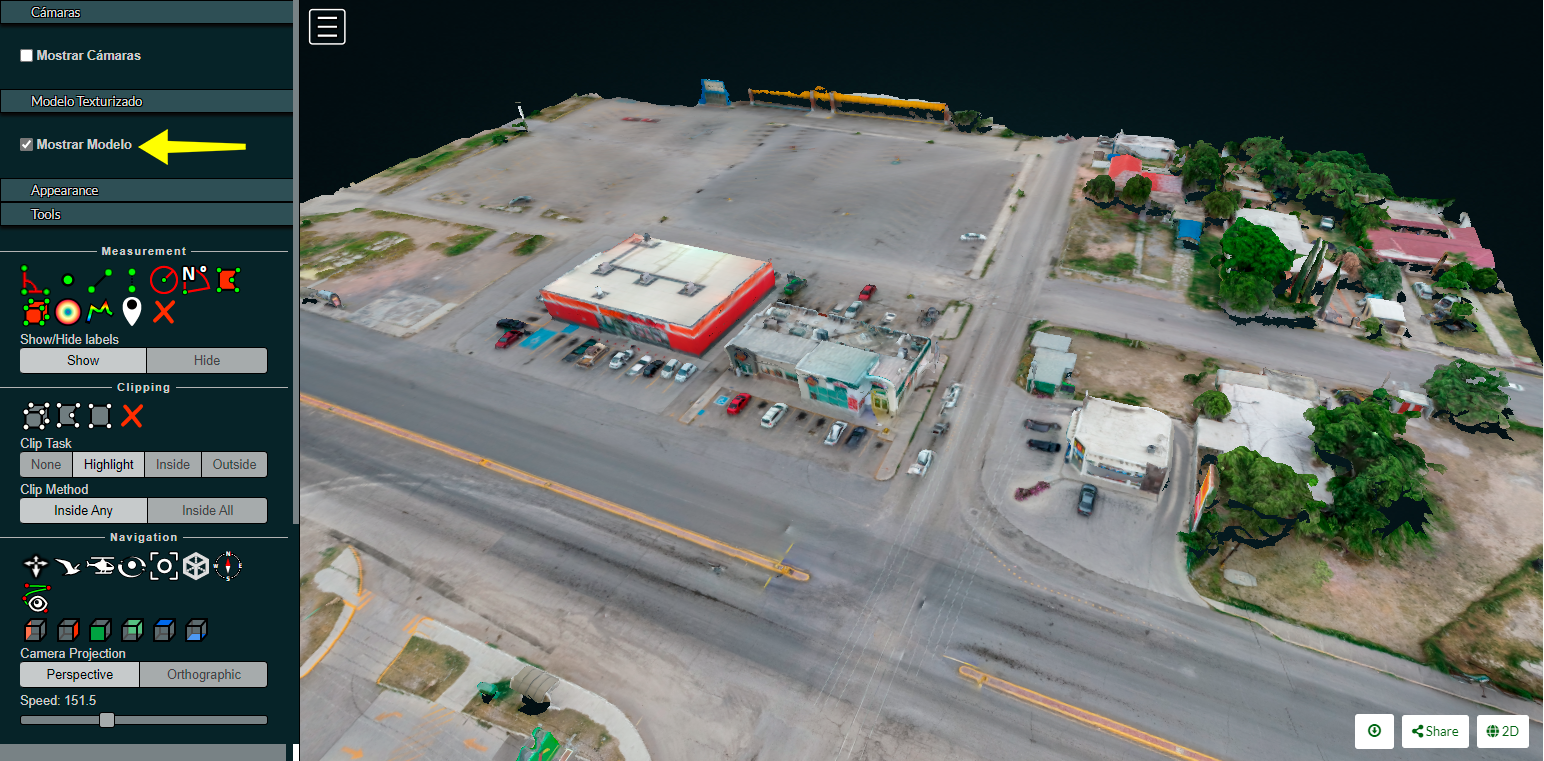
Textured model
Activate this function to show load the textured model. Depending on the file size and connection speed, it may take several seconds to load.
Appearance
Point budget
For both appearance and performance purposes, the point budget on the scene can be managed. Some old and less capable machines would benefit from a 500,000 point budget while most mid-range specs machine are capable of handling 1 to 2 million point budget.
A 5 to 7 million point budget produces a smooth point cloud 3d model, but may result in a high resource demanding process.
Default point budget value is set to 1,000,000.
Field of view
In order to control model elements to be included within the scene the field of view can be adjusted. Default value is set to 60 degrees.
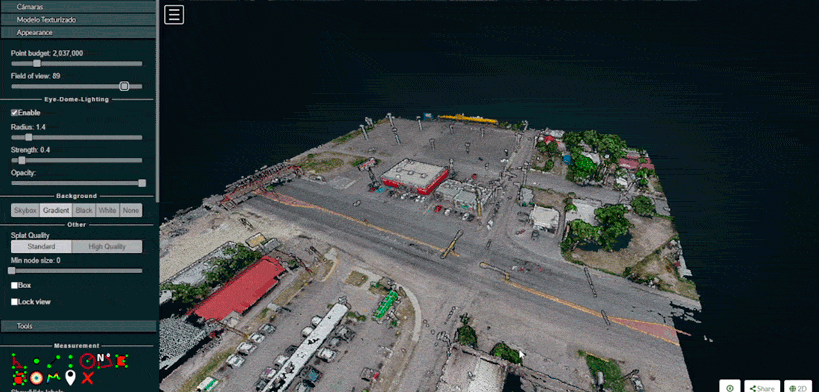
Eye Dome-lighting
The Potree Point Cloud 3d viewer module can implement eye dome-lighting, a lighting model that accentuates the shapes of objects.
Eye Dome-lighting group objects, shade their outlines and enhances depth perception in scientific visualization images. It is useful for recognition and measurement of structures within a model. It can be modified by adjusting Radius, Strength and Opacity.
By default, Eye Dome-Lighting is enabled on Potree 3D viewer, but it can be disabled by clicking on the enable option.
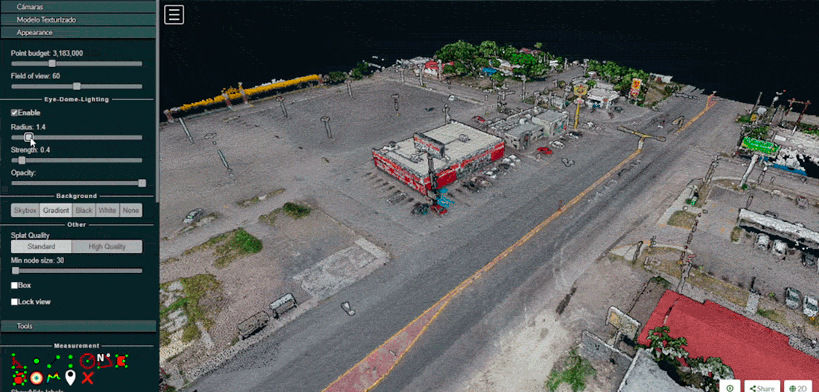
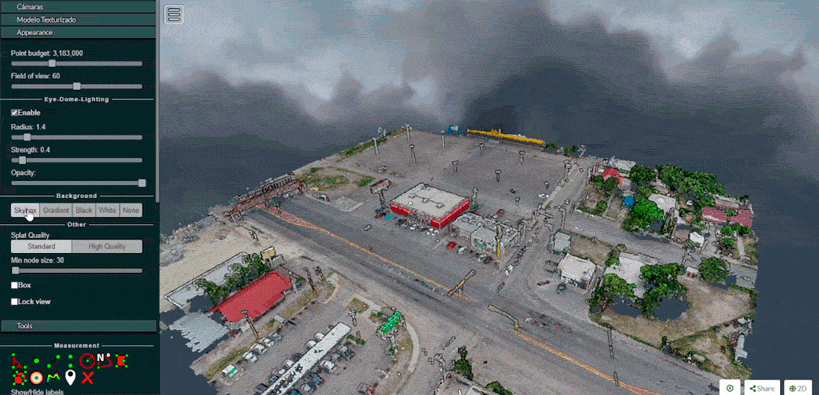
Background
Potree 3D viewer background can be modified. Available options are Skybox / Gradient / Black / White / None
Other
Splat Quality = Splat quality can be adjusted to standard or high quality, to improve the appearance of the model.
Min node size = Min node size option will impact the point density of the nodes represented.
Box = Display the boxes of the nodes.
Lock view = Lock the point cloud view, preventing to load or unload points to the model.
Tools
Measurement
Potree 3D viewer module provides several tools for measurement. This tool set consist of 12 elements. It also has controls for showing or hiding the resulting measurement labels.
Measurements are performed by left clicking on the desired points and for some tools right clicking is needed in order to terminate the process.
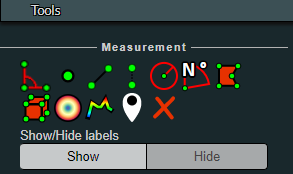
Angle
This tool measures the tridimensional angle formed by the lines connecting 3 points. To start a measurement, click on the angle icon, then left click on 3 point and the process will be automatically ended. Further information can also be obtained from selecting this element under the scene section.
Point
This tool highlights a selected point and display its XYZ coordinate. To start a measurement, click on the point icon, then click on the desired point and the process will be automatically ended. Further information can also be obtained from selecting this element under the scene section.
Distance
This tool measures the tridimensional distance of the lines connecting a series of points. To start a measurement, click on the distance icon and start clicking on the desired points (two or more). Right click to finish measurement. Further information such as Total length can also be obtained from selecting this element under the scene section.
Height
This tool measures the height or vertical distance between two points. To start a measurement, click on the height icon and then click on the desired two points. The process will be automatically ended. Further information can also be obtained from selecting this element under the scene section.
Circle
This tool measures the radius of a circle formed by three points. To start a measurement, click on the circle icon and then click on the desired two points. The process will be automatically ended. Further information such as Circumference can also be obtained from selecting this element under the scene section.
Azimuth
This tool measures the azimuthal angle of a line. This line is formed by two points selected by the user, the angle is measured in degrees, clockwise from 0 to 360 and starting from the geographical north. To start a measurement, click on the azimuth icon and then click on the desired two points. The process will be automatically ended. Further information can also be obtained from selecting this element under the scene section.
Area
This tool measures the horizontal area formed by a polygon. To start a measurement, click on the area icon and start clicking on the points forming the desired polygon (three or more). Right click to finish measurement. Further information can also be obtained from selecting this element under the scene section.
Volume (cube)
This tool measures the volume formed by a cube. To start a measurement, click on the volume (cube) icon and click on the model to place the cube. It is possible relocate, redimension and rotate the cube using the displayed handlers. Right click to finish measurement. Further information can also be obtained from selecting this element under the scene section.
Volume (sphere)
This tool measures the volume formed by a sphere. To start a measurement, click on the volume (sphere) icon and click on the model to place the sphere. It is possible relocate, redimension and rotate the sphere using the displayed handlers. Right click to finish measurement. Further information can also be obtained from selecting this element under the scene section.
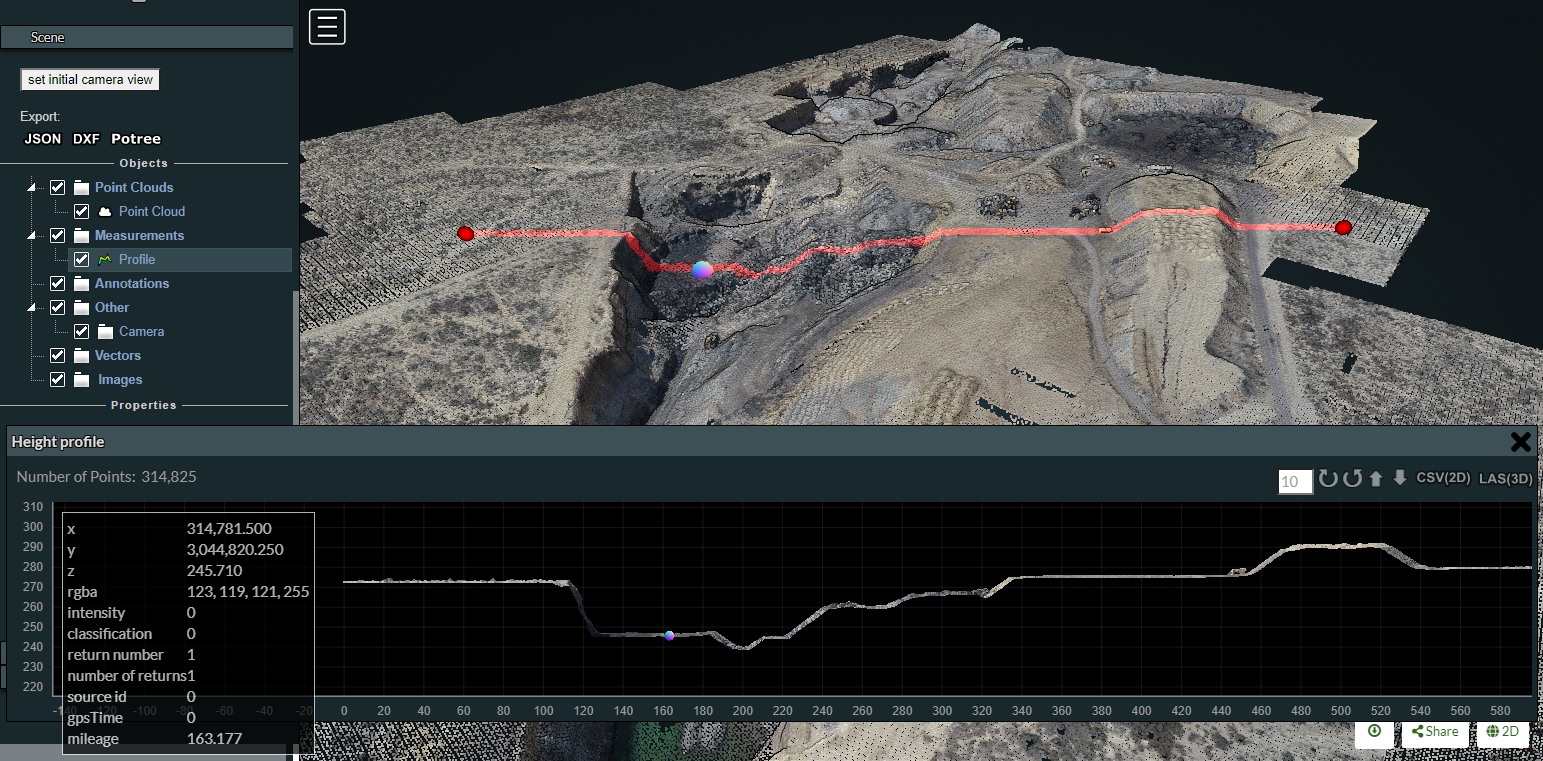
Height profile
This tool creates a height profile formed by a line on the model. To start a measurement, click on the Height profile icon and then form a line on the model by clicking on the desired points (two or more). Right click to finish measurement. Further information and options, such as "Show 2d Profile", can also been obtained from selecting this element under the scene section.
Annotation
This tool creates an annotation label on a highlighted point on the model. To start a measurement, click on the annotation icon and then click on the desired point. The process will be automatically ended. To edit the annotation, select this element under the scene section, then edit Title and Description.
Remove measurements
This tool removes all measurements on the model. To remove all measurement, click on the "Remove measurements" icon.
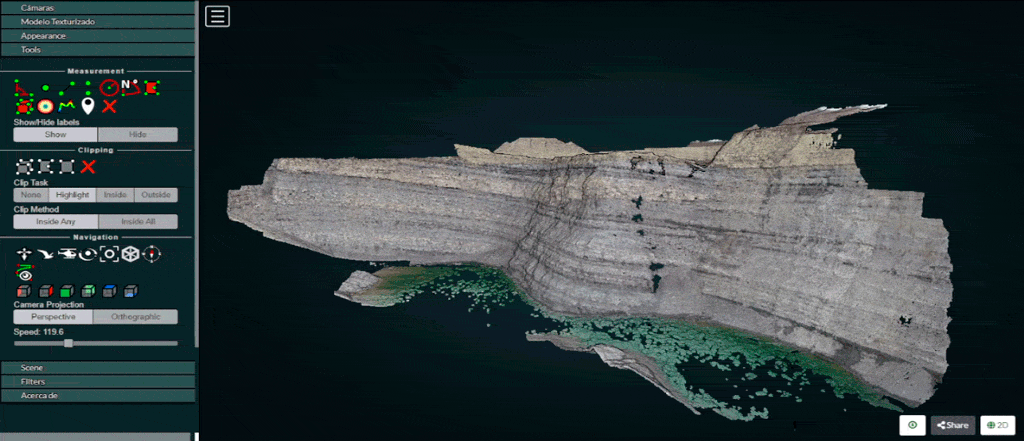
Clipping
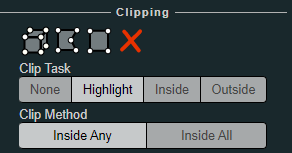
Point cloud can be clipped by selecting an area. Clipping options include None / Highlight / Inside / Outside
To clip a point cloud, click on the volume clip icon, place the cube on the model and relocate, redimension and rotate to contain the desired area. Highlight is set by default as the clipping method. If display only the points contained within the cube click on "Inside", otherwise click on "Outside".
To remove the clipping volume or polygons click on the "Remove all measurements" icon.
Navigation
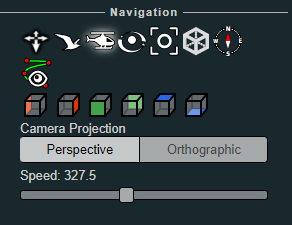
Potree 3D viewer have 4 Navigation controls which define its behavior.
Earth Control
Earth control navigated as anchored to the ground. Mouse left button moves the model horizontally, mouse wheel controls zoom and right button orbits the model.
Fly control
Fly control moves the camera as in birds eye using the keyboard. Keys "W" and "S" moves forward and backwards, respectively and in the direction of the camera, while "A" and "D" moves left and right respectively. Also, the "R" and "F" keys moves the camera up and down. The mouse left button changes the direction of the camera, mouse wheel controls zoom, and right button moves the camera in the XYZ axis.
The speed for these movements can be controlled using the sliding control.
Helicopter control
Helicopter control moves the camera as in an aircraft using the keyboard. Keys "W" and "S" moves forward and backwards, respectively restricted in a horizontal plane, while "A" and "D" moves left and right respectively. Also, the "R" and "F" keys moves the camera up and down. The mouse left button changes the direction of the camera, mouse wheel controls zoom, and right button moves the model in the XY axis.
The speed for these movements can be controlled using the sliding control.
Orbit Control
Orbit Control is the default navigation behavior. The mouse left button orbits the model, the wheel controls zoom and the right button moves the model in the XYZ axis.
Full extent
Full extent button restores the model view.
Navigation cube
Navigation cube displays a wireframe cube containing the model.
Compass
Compass button displays a compass on the upper right corner.
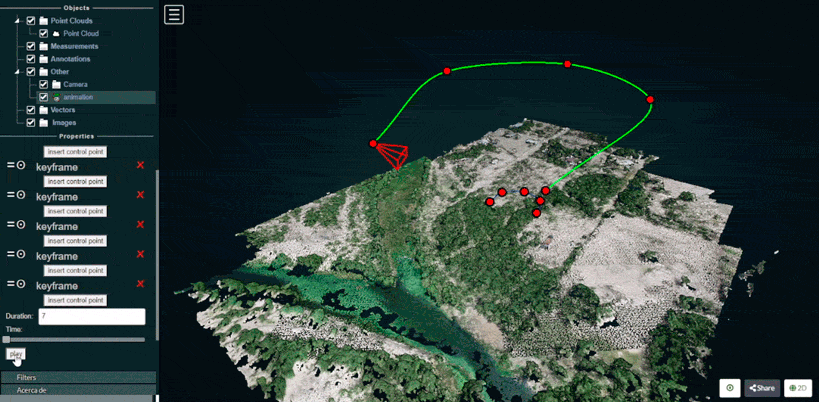
Camera animation
The camera animation button creates a camera animation path. Position of the camera is defined by the points on the green line while the points in the blue line are the location towards the camera is intended to be facing.
To create an animation, adjust the points for the camera locations and camera direction, then select the camera element under the Scene section to create more point, change animation speed or play the animation.
Scene
The Scene section displays a file tree containing all the scene elements. Elements are arranged in six groups, which are Point clouds / Measurements / Annotations / Other / Vector / Images
Each element under these groups can be selected to get further information or to control its properties.
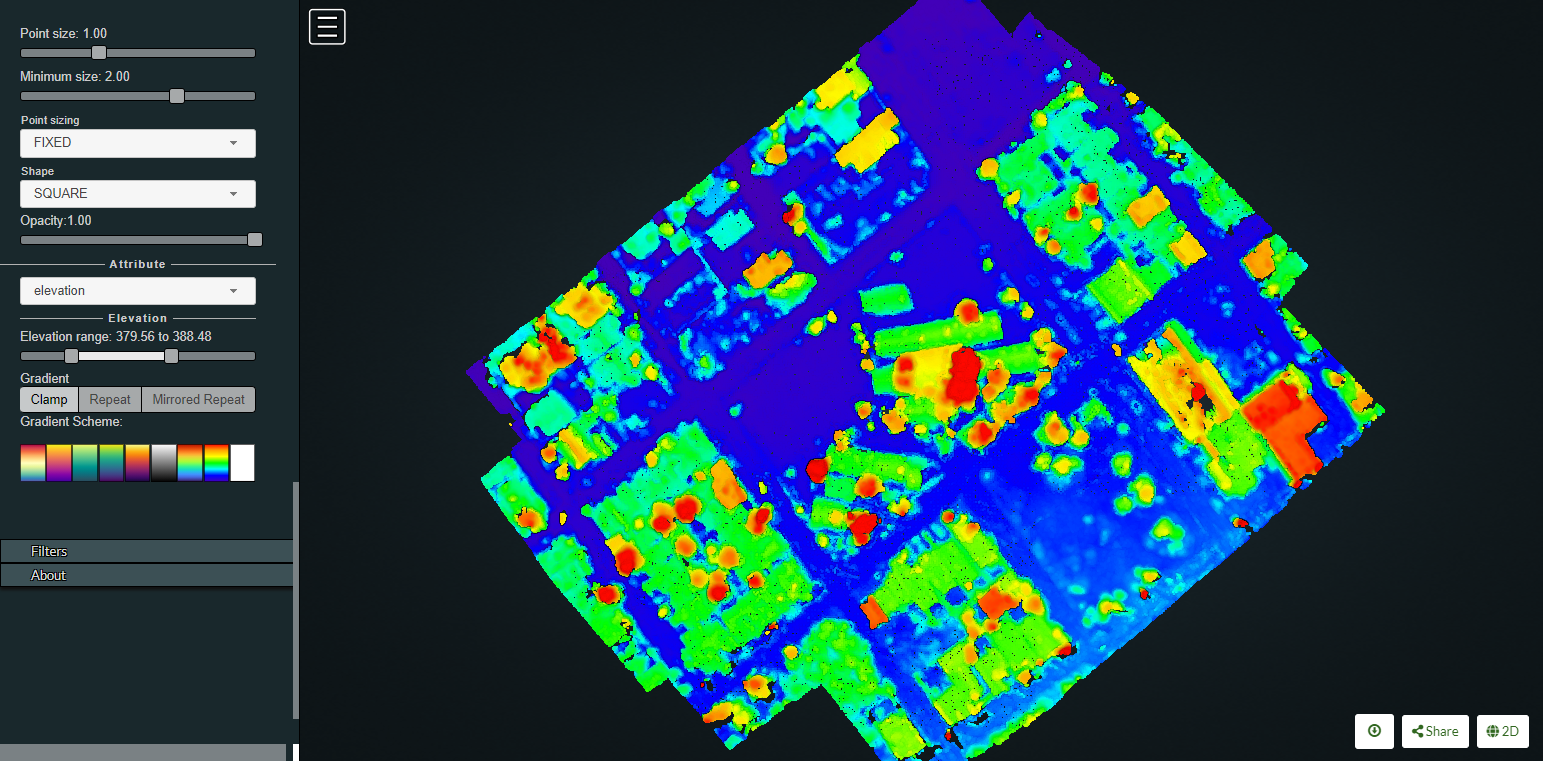
For instance, point clouds properties can be modified to show elevation and also the color ramp cam be customized.
Learn to edit and help improve this page!