Large Datasets
Starting with ODM version 0.6.0 you can split up very large datasets into manageable chunks (called submodels), running the pipeline on each chunk, and then producing merged DEMs, orthophotos and point clouds. The process is referred to as “split-merge”.
Why might you use the split-merge pipeline? If you have a very large number of images in your dataset, split-merge will help make the processing more manageable on a large machine (it will require less memory). If you have many machines all connected to the same network you can also process the submodels in parallel, thus allowing for horizontal scaling and processing thousands of images more quickly.
Local Split-Merge
Splitting a dataset into more manageable submodels and sequentially processing all submodels on the same machine is easy! Just use --split and --split-overlap to decide the the average number of images per submodels and the overlap (in meters) between submodels respectively
docker run -ti --rm -v /my/project:/datasets/code opendronemap/odm --project-path /datasets --split 400 --split-overlap 100
If you already know how you want to split the dataset, you can provide that information and it will be used instead of the clustering algorithm.
The grouping can be provided by adding a file named image_groups.txt in the main dataset folder. The file should have one line per image. Each line should have two words: first the name of the image and second the name of the group it belongs to. For example:
01.jpg A
02.jpg A
03.jpg B
04.jpg B
05.jpg C
will create 3 submodels. Make sure to pass --split-overlap 0 if you manually provide a image_groups.txt file.
Distributed Split-Merge
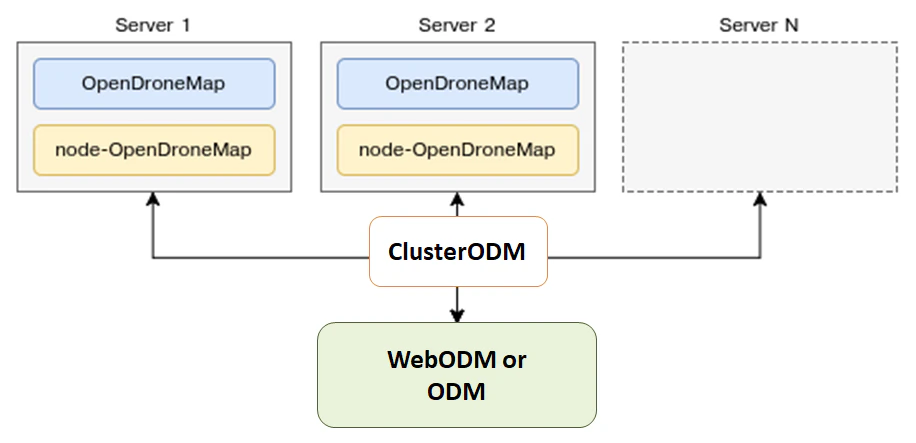
ODM can also automatically distribute the processing of each submodel to multiple machines via NodeODM nodes, orchestrated via ClusterODM.
Getting Started with Distributed Split-Merge
The first step is start ClusterODM
docker run -ti -p 3001:3000 -p 8080:8080 opendronemap/clusterodm
Then on each machine you want to use for processing, launch a NodeODM instance via
docker run -ti -p 3000:3000 opendronemap/nodeodm
Connect via telnet to ClusterODM and add the IP addresses/port of the machines running NodeODM
$ telnet <cluster-odm-ip> 8080
Connected to <cluster-odm-ip>.
Escape character is '^]'.
[...]
# node add <node-odm-ip-1> 3000
# node add <node-odm-ip-2> 3000
[...]
# node list
1) <node-odm-ip-1>:3000 [online] [0/2] <version 1.5.1>
2) <node-odm-ip-2>:3000 [online] [0/2] <version 1.5.1>
Make sure you are running version 1.5.1 or higher of the NodeODM API.
At this point, simply use the --sm-cluster option to enable distributed split-merge
docker run -ti --rm -v /my/project:/datasets/code opendronemap/odm --project-path /datasets --split 800 --split-overlap 120 --sm-cluster http://<cluster-odm-ip>:3001
Understanding the Cluster
When connected via telnet, it is possible to interrogate what is happening on the cluster. For example, we can use the command HELP to find out available commands
# HELP
NODE ADD <hostname> <port> [token] - Add new node
NODE DEL <node number> - Remove a node
NODE INFO <node number> - View node info
NODE LIST - List nodes
NODE LOCK <node number> - Stop forwarding tasks to this node
NODE UNLOCK <node number> - Resume forwarding tasks to this node
NODE UPDATE - Update all nodes info
NODE BEST <number of images> - Show best node for the number of images
ROUTE INFO <taskId> - Find route information for task
ROUTE LIST [node number] - List routes
TASK LIST [node number] - List tasks
TASK INFO <taskId> - View task info
TASK OUTPUT <taskId> [lines] - View task output
TASK CANCEL <taskId> - Cancel task
TASK REMOVE <taskId> - Remove task
ASR VIEWCMD <number of images> - View command used to create a machine
!! - Repeat last command
If, for example, the NodeODM instance wasn’t active when ClusterODM started, we might list nodes and see something as follows
# NODE LIST
1) localhost:3000 [offline] [0/2] <version 1.5.3> [L]
To address this, we can start up our local node (if not already started), and then perform a NODE UPDATE
# NODE UPDATE
OK
# NODE LIST
1) localhost:3000 [online] [0/2] <version 1.5.3> [L]
Accessing the Logs
While a process is running, it is also possible to list the tasks, and view the task output
# TASK LIST
# TASK OUTPUT <taskId> [lines]
Autoscaling ClusterODM
ClusterODM also includes the option to autoscale on multiple platforms, including, to date, Amazon and Digital Ocean. This allows users to reduce costs associated with always-on instances as well as being able to scale processing based on demand.
To setup autoscaling you must:
Have a functioning version of NodeJS installed and then install ClusterODM
git clone https://github.com/OpenDroneMap/ClusterODM
cd ClusterODM
npm install
Make sure docker-machine is installed.
Setup a S3-compatible bucket for storing results.
Create a configuration file for DigitalOcean or Amazon Web Services.
You can then launch ClusterODM with
node index.js --asr configuration.json
You should see something similar to following messages in the console
info: ASR: DigitalOceanAsrProvider
info: Can write to S3
info: Found docker-machine executable
You should always have at least one static NodeODM node attached to ClusterODM, even if you plan to use the autoscaler for all processing. If you setup auto scaling, you can’t have zero nodes and rely 100% on the autoscaler. You need to attach a NodeODM node to act as the “reference node” otherwise ClusterODM will not know how to handle certain requests (for the forwarding the UI, for validating options prior to spinning up an instance, etc.). For this purpose, you should add a “dummy” NodeODM node and lock it
telnet localhost 8080
> NODE ADD localhost 3001
> NODE LOCK 1
> NODE LIST
1) localhost:3001 [online] [0/2] <version 1.5.1> [L]
This way all tasks will be automatically forwarded to the autoscaler.
Limitations
The 3D textured meshes are currently not being merged as part of the workflow (only point clouds, DEMs and orthophotos are).
GCPs are fully supported, however, there needs to be at least 3 GCP points on each submodel for the georeferencing to take place. If a submodel has fewer than 3 GCPs, a combination of the remaining GCPs + EXIF data will be used instead (which is going to be less accurate). We recommend using the image_groups.txt file to accurately control the submodel split when using GCPs.
Estimating data collection effort
Larger datasets can be collected with specialized fix wing UAVs, vertical takeoff and landing (VTOL) UAVs, and collected quite efficiently under certain conditions. In many instances, however, we are constrained to doing data collection efforts with commodity quadcopters. In these cases, a common question is the data collection time under ideal conditions with commodity equipment.
Data collection effort, full 3D
For best in class results with full 3D reconstruction and 5cm resolution, it is feasible to collect 1-2km2 per person, per day. This requires the following set of flights:
60% overlap nadir flight
70-80% overlap 45-degree gimbal angle cross-grid
The 45-degree cross-grid flight provides the basis for a fully tied together model, while the nadir flights provide the necessary texture for orthophoto texturing. The lower overlap meets the minimum requirement for orthophoto products as facilitated by by feature matching from the much higher overlap cross-grid.
Data collection effort, 2D and 2.5D products
For best in class results 2D and 2.5D products and 5cm resolution, it is feasible to collect 2-4km2 per person, per day. This requires the following set of flights:
70-80% overlap slightly off-nadir (5-10 degree off nadir)
For more complex buildings and vegetation, aim for closer to 80% overlap. If buildings, vegetation, and terrain changes are not complex, it’s quite feasible to use closer to 70% overlap.
(credit: derived from ongoing conversations with Ivan Gayton, Humanitarian OpenStreetMap Team)
Acknowledgments
Huge props to Pau and the folks at Mapillary for their amazing contributions to OpenDroneMap through their OpenSfM code, which is a key component of the split-merge pipeline. We look forward to further pushing the limits of OpenDroneMap and seeing how big a dataset we can process.
Learn to edit and help improve this page!