Cara memulai dan instalasi
Bagian ini dikutip dan dimodifikasi dengan izin dari OpenDroneMap: Panduan yang Hilang, oleh Piero Toffanin.
Quickstart
Installers for OpenDroneMap are available for purchase, and are the easiest way to get started and come with support.
https://opendronemap.org/webodm/download/#installer
That said, OpenDroneMap is a free and open source ecoystem. Community support is available for those looking to install themselves and directions follow:
Rekomendasi Perangkat Keras
Persyaratan minimal untuk menjalankan perangkat lunak adalah:
CPU 64bit diproduksi pada atau setelah 2010
Media penyimpanan 20 GB
RAM 4 GB
Tidak lebih dari 100-200 gambar yang dapat diproses dengan spesifikasi di atas (software akan kehabisan memori). Persyaratan yang direkomendasikan adalah:
CPU Generasi Terakhir
Media penyimpanan 100 GB
RAM 16 GB
The above will allow the processing of a few hundred images with minimal issues. A CPU with more cores will allow for faster processing, while a graphics card (GPU) currently has no impact on performance. For processing more images, add more disk space and RAM linearly to the number of images you need to process.
Number of images |
RAM or RAM + Swap |
|---|---|
40 |
4 |
250 |
16 |
500 |
32 |
1500 |
64 |
2500 |
128 |
3500 |
192 |
5000 |
256 |
Instalasi
Kami menyarankan orang-orang menggunakan docker <https://www.docker.com> _ untuk menjalankan ODM, baik anda menggunakan Windows, macOS atau Linux.
Windows
Untuk menjalankan OpenDroneMap Anda membutuhkan setidaknya Windows 7. Versi Windows sebelumnya tidak didukung.
Langkah 1. Periksa Dukungan Virtualisasi
Docker memerlukan fitur dari CPU anda yang disebut virtualisasi, yang memungkinkannya menjalankan mesin virtual (VM). Pastikan anda telah mengaktifkannya! Terkadang ini dinonaktifkan. Untuk memeriksanya, pada Windows 8 atau lebih tinggi ada dapat membuka Task Manager (tekan CTRL + SHIFT + ESC) dan beralih ke tab Performance.
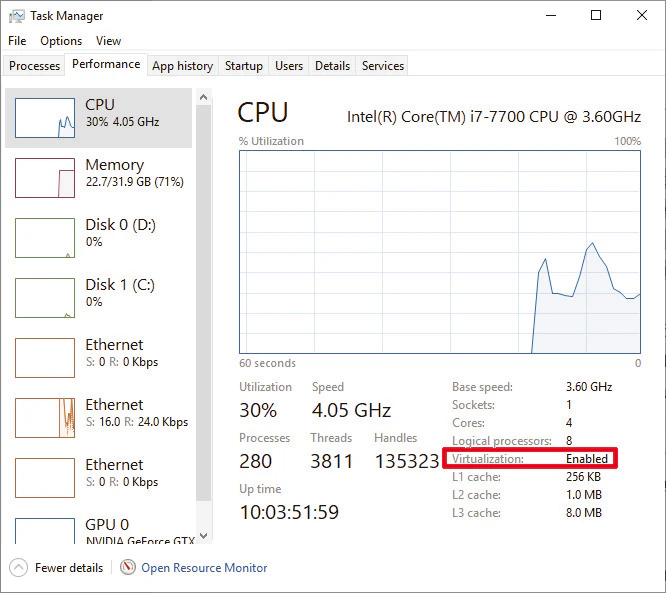
Virtualisasi harus diaktifkan
Di Windows 7 untuk mengetahui apakah anda telah mengaktifkan virtualisasi, anda dapat menggunakan Alat Deteksi Virtualisasi Berbantuan Perangkat Keras Microsoft® sebagai gantinya.
If virtualization is disabled, you’ll need to enable it. The procedure unfortunately is a bit different for each computer model, so the best way to do this is to look up on a search engine “how to enable vtx for <type your computer model here>”. Often times it’s a matter of restarting the computer, immediately pressing F2 or F12 during startup, navigating the boot menu and changing the settings to enable virtualization (often called “VT-X”).
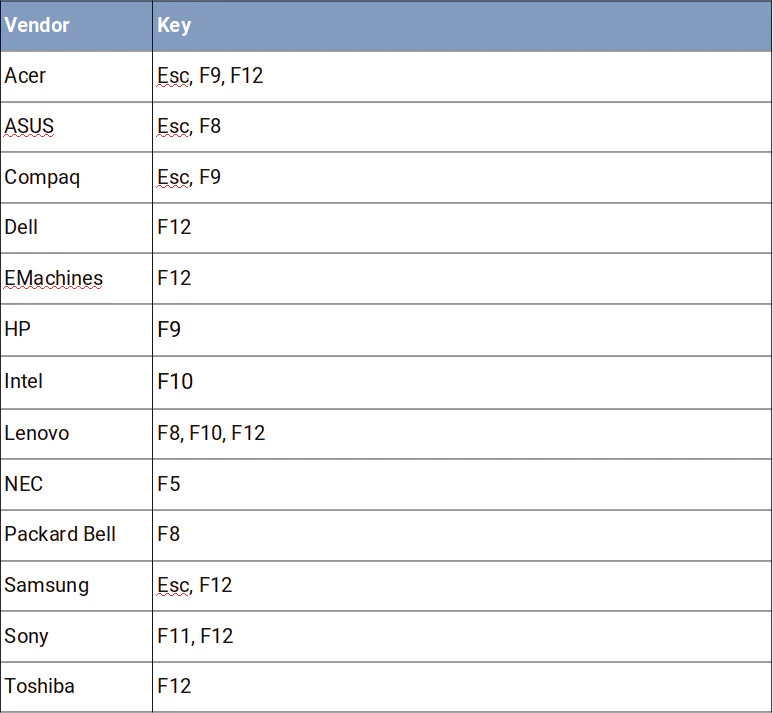
Tombol umum yang harus ditekan saat komputer dihidupkan untuk mengakses menu boot untuk berbagai vendor PC
Langkah 2. Instal Persyaratan
Pertama kali, kamu harus menginstal:
Python (versi terakhir 3): https://www.python.org/downloads/windows/
Untuk Python 3, pastikan Anda mencentang Menambahkan Python 3.x ke PATH selama instalasi.
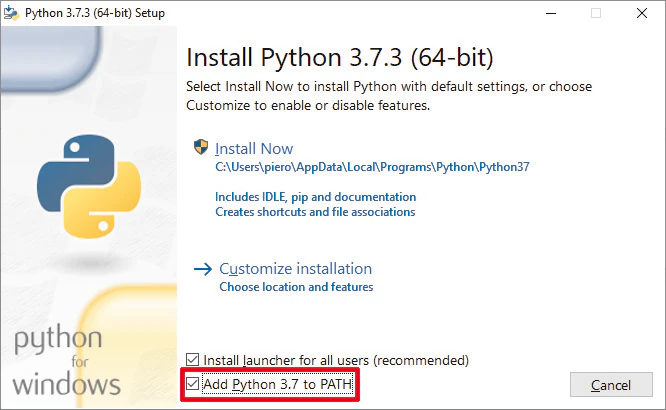
Jangan lupa untuk menambahkan Python yang dapat dieksekusi ke PATH anda (sehingga anda dapat menjalankan perintah dengannya)
Kemudian, hanya jika anda menggunakan Windows 10 Home, Windows 8 (versi apa pun) atau Windows 7 (versi apa pun), instal:
Kotak Alat Docker: https://github.com/docker/toolbox/releases/download/v18.09.3/DockerToolbox-18.09.3.exe
Jika anda menggunakan Windows 10 Professional atau versi yang lebih baru, anda harus menginstalnya:
Docker for Windows:https://docs.docker.com/desktop/install/windows-install/
Harap JANGAN menginstal kedua program docker. Keduanya berbeda dan akan membuat kekacauan jika keduanya dipasang.
After installing docker, launch it from the Desktop icon that is created from the installation (Docker Quickstart in the case of Docker Toolbox, Docker for Windows for Docker for Windows). This is important, do not skip this step. If there are errors, follow the prompts on screen to fix them.
Langkah 3. Periksa Alokasi Memori dan CPU
Docker di Windows bekerja dengan menjalankan VM di latar belakang (anggap VM sebagai "emulator komputer"). VM ini memiliki sejumlah memori yang dialokasikan dan WebODM hanya dapat menggunakan memori sebanyak yang dialokasikan.
If you installed Docker Toolbox (see below if you installed Docker for Windows instead):
Buka aplikasi VirtualBox Manager
Right click the default VM and press Close (ACPI Shutdown) to stop the machine
Right click the default VM and press Settings...
Pindahkan penggeser Memori Dasar dari panel Sistem dan alokasikan 60-70% dari semua memori yang tersedia, secara opsional menambahkan 50% prosesor yang tersedia dari tab Prosesor juga
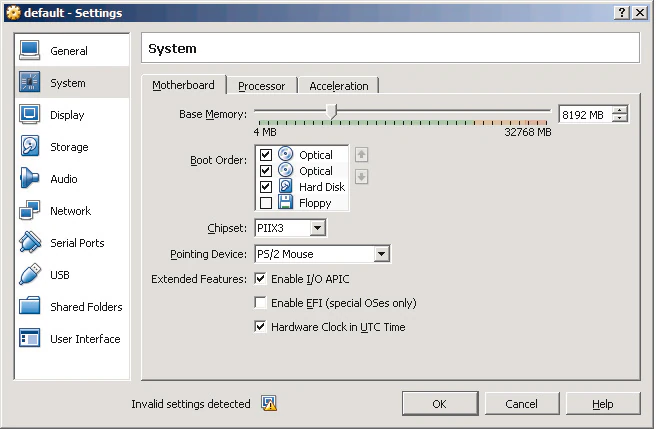
VirtualBox default VM settings
Then press OK, right click the default VM and press Start.
Jika anda menginstal Docker untuk Windows sebagai gantinya:
Lihat di baki sistem dan klik kanan ikon "paus putih".
Dari menu, tekan Pengaturan...
From the panel, click Advanced and use the sliders to allocate 60-70% of available memory and use half of all available CPUs.
Tekan Terapkan.
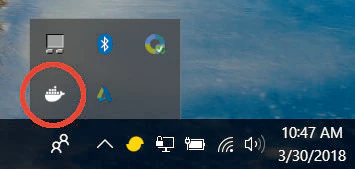
Langkah 1 Ikon Docker
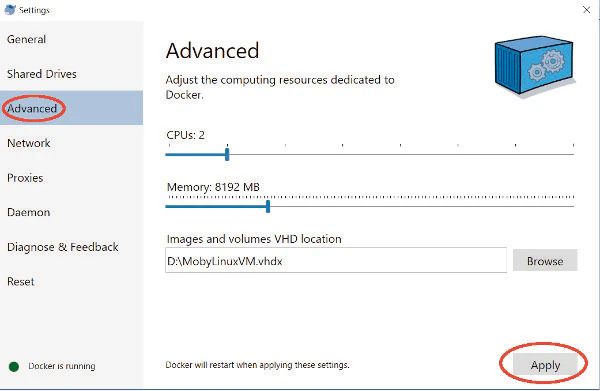
Langkah 3 & 4 Pengaturan Docker
Langkah 4. Unduh WebODM
Buka program Git Gui yang sudah diinstal dengan Git. Dari sana:
Saat Git Gui terbuka, klik opsi 'Gandakan Repositori yang Ada'
Di Lokasi Sumber ketik: https://github.com/OpenDroneMap/WebODM
In Target Directory click browse and navigate to a folder of your choosing (create one if necessary)
Tekan Gandakan
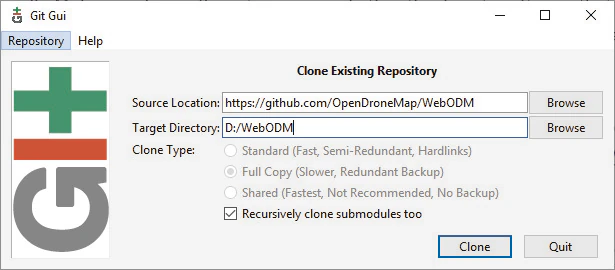
Git Gui
Jika unduhan berhasil, anda sekarang akan melihat jendela ini:
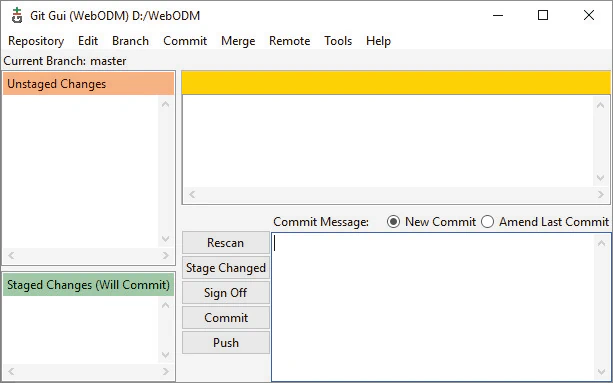
Git Gui setelah berhasil mengunduh (Gandakan)
Go to the Repository menu, then click Create Desktop Icon. This will allow you to come back to this application easily in the future.
Langkah 4. Luncurkan WebODM
From Git Gui, go to the Repository menu, then click Git Bash. From the command line terminal type:
$ ./webodm.sh start &
Beberapa komponen akan diunduh ke mesin anda pada saat ini, termasuk WebODM, NodeODM, dan ODM. Setelah mengunduh, anda akan disambut oleh layar berikut:
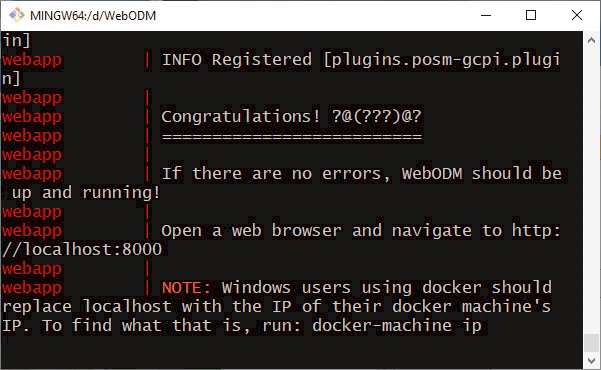
Keluaran konsol setelah memulai WebODM untuk pertama kalinya
Jika anda menggunakan Docker untuk Windows, buka browser web ke http://localhost:8000
If you are using Docker Toolbox, find the IP address to connect to by typing:
$ docker-machine ip
Anda harus mendapatkan hasil seperti berikut:
192.168.1.100
Kemudian sambungkan ke http://192.168.1.100:8000 (mengganti alamat IP dengan yang benar).
macOS
Most modern (post 2010) Mac computers running macOS Sierra 10.12 or higher can run OpenDroneMap using docker, as long as hardware virtualization is supported (see below).
Langkah 1. Periksa Dukungan Virtualisasi
Open a Terminal window and type:
$ sysctl kern.hv_support
Anda akan mendapatkan tanggapan yang mirip dengan berikut ini:
kern.hv_support: 1
Jika hasilnya kern.hv_support: 1, maka Mac Anda didukung! Lanjutkan dengan Langkah 2.
Jika hasilnya kern.hv_support: 0, sayangnya itu berarti Mac Anda terlalu tua untuk menjalankan OpenDroneMap. :(
Langkah 2. Instal Persyaratan
Hanya ada dua program untuk diinstal:
Setelah menginstal Docker anda akan menemukan ikon yang terlihat seperti ikan paus di bilah tugas.

Aplikasi Docker berjalan
You can verify that docker is running properly by opening the Terminal app and typing:
$ docker run hello-world
Yang harus dikembalikan
Hello from Docker!
Untuk memverifikasi bahwa git telah diinstal, cukup ketik:
$ git --version
Yang seharusnya mengembalikan sesuatu yang mirip dengan berikut ini:
git version 2.20.1 (Apple Git-117)
If you get a “bash: git: command not found”, try to restart your Terminal app and double-check for any errors during the install process.
Langkah 3. Periksa Alokasi Memori dan CPU
Docker on macOS works by running a VM in the background (think of it as a “computer emulator”). This VM has a certain amount of memory allocated and WebODM can only use as much memory as it’s allocated.
Right click the whale icon from the task bar and click Preferences...
Select the Advanced tab
Adjust the CPUs slider to use half of all available CPUs and the memory to use 60-70% of all available memory
Tekan Terapkan & Mulai Ulang
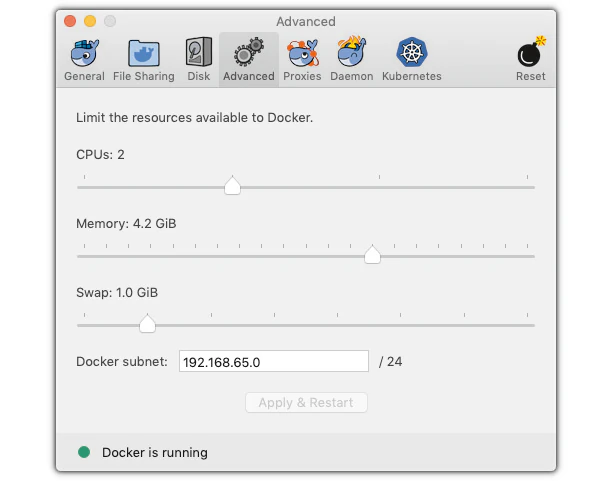
Pengaturan lanjutan Docker
Langkah 4. Unduh dan Jalankan WebODM
From a Terminal type:
$ git clone https://github.com/OpenDroneMap/WebODM
$ cd WebODM
$ ./webodm.sh start
Kemudian buka browser web ke http://localhost:8000.
Linux
OpenDroneMap can run on any Linux distribution that supports docker. According to docker’s documentation website the officially supported distributions are CentOS, Debian, Ubuntu and Fedora, with static binaries available for others. If you have to pick a distribution solely for running OpenDroneMap, Ubuntu is the recommended way to go.
Langkah 1. Instal Persyaratan
Ada empat program yang perlu diinstal:
Docker
Git
Python (2 atau 3)
Pip
Kami tidak mungkin mencakup proses instalasi untuk setiap distribusi Linux di luar sana, jadi kami akan membatasi instruksi hanya untuk distribusi yang secara resmi didukung oleh docker. Dalam semua kasus, ini hanya masalah membuka prompt terminal dan mengetik beberapa perintah.
Instal di Ubuntu / Debian
Perintah untuk mengetik:
$ sudo apt update
$ curl -fsSL https://get.docker.com -o get-docker.sh
$ sh get-docker.sh
$ sudo apt install -y git python python-pip
Instal di CentOS / RHEL
Perintah untuk mengetik:
$ curl -fsSL https://get.docker.com -o get-docker.sh
$ sh get-docker.sh
$ sudo yum -y install git python python-pip
Instal di Fedora
Perintah untuk mengetik:
$ curl -fsSL https://get.docker.com -o get-docker.sh
$ sh get-docker.sh
$ sudo dnf install git python python-pip
Instal di Arch
Perintah untuk mengetik:
$ sudo pacman -Sy docker git python python-pip
Langkah 2. Periksa Persyaratan Tambahan
In addition to the three programs above, the docker compose script is also needed. Sometimes it’s already installed with docker, but sometimes it isn’t. To verify if it’s installed try to type:
$ docker compose --version
Anda akan melihat sesuatu yang mirip dengan berikut ini:
docker compose version 24.0.5, build ced0996600
Step 3a. Download and Launch WebODM with webodm.sh call of docker compose
Dari tipe terminal:
$ git clone https://github.com/OpenDroneMap/WebODM
$ cd WebODM
$ ./webodm.sh start
Kemudian buka browser web ke http://localhost:8000.
Step 3b. Alternatively, start via docker compose without webodm.sh
copy the following 3 files into a newly created folder:
The config-default.json:
{
        "instance": "node-OpenDroneMap",
        "odm_path": "/code",

        "logger": {
                "level": "info",
                "maxFileSize": 104857600,
                "maxFiles": 10,
                "logDirectory": ""
        },

        "port": "auto",
        "deamon": false,
        "parallelQueueProcessing": 8,
        "cleanupTasksAfter": 2880,
        "test": false,
        "testSkipOrthophotos": false,
        "testSkipDems": false,
        "token": "",
        "authorizedIps": [],
        "maxImages": ""
}
The init.sql:
CREATE EXTENSION postgis_raster;
SET postgis.gdal_enabled_drivers = 'ENABLE_ALL';
And finally the compose.yml:
services:
  webodm-node-odm-1:
    image: opendronemap/nodeodm:gpu
    container_name: webodm-node-odm-1
    ports:
      - "3000:3000"
    volumes:
      - ./config-default.json:/var/www/config-default.json
    privileged: true
    restart: unless-stopped
    deploy:
      resources:
        reservations:
          devices:
            - driver: nvidia
              capabilities: [gpu]

  webapp-odm:
    image: opendronemap/webodm_webapp
    container_name: webapp
    entrypoint: /bin/bash -c "service cron start && chmod +x /webodm/*.sh && /bin/bash -c \"/webodm/wait-for-it.sh -t 0 redis-odm:6379 -- /webodm/start.sh\" && python manage.py migrate"
        restart: always
    volumes:
      - ./data/webodm:/webodm/app/media:z
    ports:
      - "8000:8000"
    depends_on:
      - db-odm
      - redis-odm
      - webodm-node-odm-1
    environment:
      - WO_BROKER=redis://redis-odm
      - WO_DEFAULT_NODES=1
      - WO_HOST=localhost
      - WO_PORT=8000
      - WO_MEDIA_DIR=appmedia
      - WO_DB_DIR=dbdata
      - WO_SSL=NO
      - WO_SSL_INSECURE_PORT_REDIRECT=80
      - WO_DATABASE_HOST=db-odm
      - WO_DATABASE_NAME=webodm_dev
      - WO_DATABASE_USER=postgres
      - WO_DATABASE_PASSWORD=postgres

  redis-odm:
    image: redis:alpine
    container_name: redis-odm
    restart: always

  db-odm:
    image: postgis/postgis:17-3.5-alpine
    container_name: db-odm
    restart: always
    volumes:
      - ./data/odm-db:/var/lib/postgresql/data
      - ./init.sql:/docker-entrypoint-initdb.d/init.sql
    environment:
      - POSTGRES_USER=postgres
      - POSTGRES_PASSWORD=postgres
      - POSTGRES_DB=webodm_dev
    healthcheck:
      test: [ "CMD", "pg_isready", "-q", "-d", "webodm_dev", "-U", "postgres"]
      timeout: 45s
      interval: 20s
      retries: 5

  worker:
    image: opendronemap/webodm_webapp
    container_name: worker
    entrypoint: /bin/bash -c "/webodm/wait-for-it.sh -t 0 redis-odm:6379 -- /webodm/wait-for-it.sh -t 0 webapp-odm:8000 -- /webodm/worker.sh start"
        restart: always
    volumes:
      - ./data/webodm:/webodm/app/media:z
    depends_on:
      - redis-odm
      - db-odm
    environment:
      - WO_BROKER=redis://redis-odm
      - WO_DATABASE_HOST=db-odm
      - WO_DATABASE_NAME=webodm_dev
      - WO_DATABASE_USER=postgres
      - WO_DATABASE_PASSWORD=postgres
Finally, start the stack using docker compose up -d.
You can now access WebODM at http://localhost:8000 and the nodeODM at http://localhost:3000.
To view logs of the services use docker compose logs
To shut down the services run docker compose down.
Perintah Dasar dan Pemecahan Masalah
Hal yang keren tentang penggunaan docker adalah 99% tugas yang anda perlukan saat menggunakan WebODM dapat dilakukan melalui skrip ./webodm.sh. Anda telah menjumpai salah satunya:
$ ./webodm.sh start
which takes care of starting WebODM and setting up a default processing node (node-odm-1). If you want to stop WebODM, you can already guess what the command is:
$ ./webodm.sh stop
There are several other commands you can use, along with different flags. Flags are parameters passed to the ./webodm.sh command and are typically prefixed with “–”. The port flag for example instructs WebODM to use a different network port:
$ ./webodm.sh start --port 80
Perintah berguna lainnya tercantum di bawah ini:
# Restart WebODM (useful if things get stuck)
$ ./webodm.sh restart

# Reset the admin user's password if you forget it
$ ./webodm.sh resetadminpassword newpass

# Update everything to the latest version
$ ./webodm.sh update

# Store processing results in the specified folder instead of the default location (inside docker)
$ ./webodm.sh restart --media-dir /path/to/webodm_results

# See all options
$ ./webodm.sh --help
Forum komunitas adalah tempat yang tepat untuk meminta bantuan jika anda mengalami kebuntuan selama salah satu langkah penginstalan dan untuk pertanyaan umum tentang penggunaan skrip ./webodm.sh.
Halo, WebODM!
After starting the containers using 3a. or 3b. you can open WebODM in the browser. This will greet you with a welcome message and will ask to create the first user. Take some time to familiarize yourself with the web interface and explore its various menus.
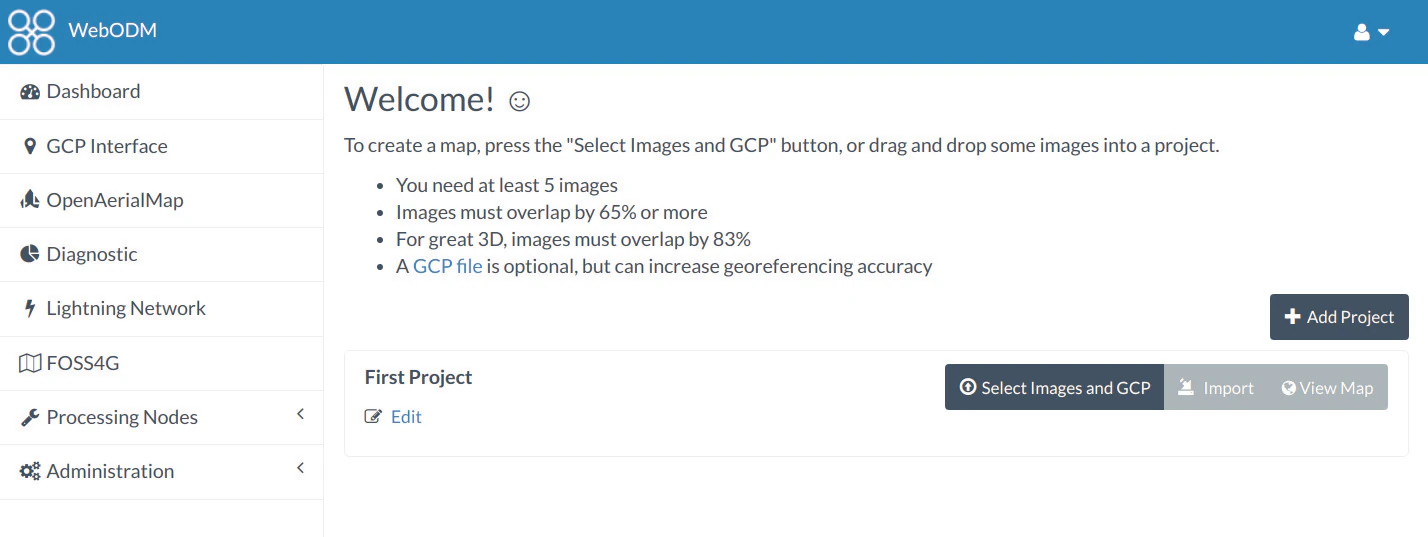
Dasbor WebODM
Notice that under the Processing Nodes menu there’s a "node-odm-1" node already configured for you to use. This is a NodeODM node and has been created automatically by WebODM. This node is running on the same machine as WebODM.
Selamat jika anda sudah sampai sejauh ini! Sekarang saatnya mulai memproses beberapa data.

Berjalan di lebih dari satu mesin
Opsional: Jika anda memiliki komputer lain, anda dapat mengulangi proses instalasi (menginstal docker, git, python, dll.) dan meluncurkan node NodeODM baru dengan mengetik dari jendela Terminal / Git Bash:
docker run --rm -it -p 3000:3000 opendronemap/nodeodm -q 1 --token secret
The above command asks docker to launch a new container using the opendronemap/nodeodm image from Docker Hub (the latest version of NodeODM), using port 3000, setting a maximum number of concurrent tasks to 1 and to protect the node from unauthorized access using the password "secret".
From WebODM you can then press the Add New button under Processing Nodes. For the hostname/IP field type the IP of the second computer. For the port field type “3000”. For the token field type “secret”. You can also add an optional label for your node, such as “second computer”. Then press Save.
Jika semuanya berjalan dengan baik, anda sekarang harus memiliki dua node pemrosesan! Anda akan dapat memproses banyak tugas secara paralel menggunakan dua mesin berbeda.
Belajar mengedit dan membantu meningkatkan halaman ini!